Inventory Application
Develop and deploy an example microservices application
Develop an example application with a three-tier microservices architecture and deploy it in IBM Cloud Kubernetes Service or Red Hat OpenShift on IBM Cloud using the IBM Garage Cloud-Native Toolkit Developer Environment including its Code Patterns.
Business Need
In this guide, imagine you have completed an Enterprise Design Thinking Workshop and the result is an MVP statement that defines the desired business outcomes. Use the steps below to help deliver this MVP quickly while following Garage Method best practices.
MVP Statement
An MVP is a first hill. Here’s the hill statement for the MVP we’re going to build:
Who: Distribution employees in each of the regional warehouses
What: A secure web application that enables easy access to list of product SKU inventory levels and inventory locations
Wow: Make the system appealing and easy to use. Deliver it hosted on the IBM Cloud platform. Develop it quickly as a minimum viable product. Use the latest managed container runtimes and DevOps best practices to enable post MVP feature improvements. Simulate a release to a Test environment.
Architecture
We will build the Micro App using a three-tier microservices architecture. Each tier encapsulates a clean separation of concerns. Each app component will be modelled using microservices and use a number of polyglot programming languages and frameworks. Data will be stored in IBM Cloudant and the Micro App will be secured using IBM App ID.

User interface
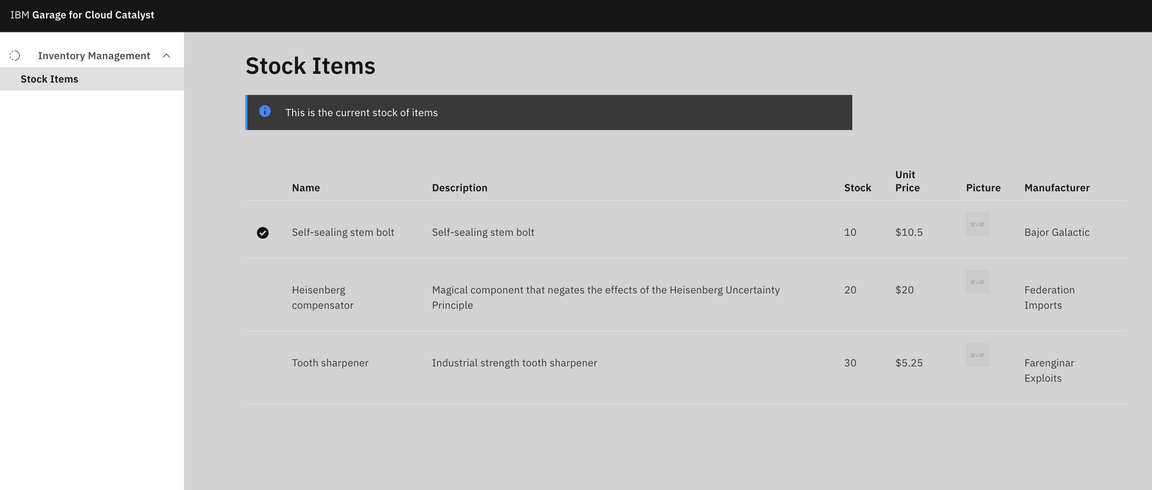
The Micro App’s user interface will look like this wireframe:

Technical Requirements
The Micro App should adhere to the following technical requirements:
- Microservices
- Stateless
- REST APIs
- Polyglot
- DevOps with CI/CD (continuous integration and continuous delivery)
- Monitoring and logging
- Code analysis
- App security
- Deployed to Red Hat OpenShift on IBM Cloud or IBM Cloud Kubernetes Service
- Follow the Carbon Design System user experience
Guide
You will approach creating the Micro App bottom up, meaning you will start by creating the backend microservice that manages integration with the data persistence and then build out the digital channel using a backend for frontend pattern. Finally, you will add a web UI to the solution.
Prebuilt Solution
If you want to skip the guide and just get the components running, see Deploy the Inventory App solution.
Deploy the Inventory App solution
If you were unable to get everything working, you can deploy the Inventory App solution.
Inventory Services
Create a new project from the Inventory Management Service solution template named
inventory-management-svc-{initials}Clone the repository to your local machine
Log into the cluster from the command-line then register the pipeline
oc pipeline -n dev-{your initials}- replacing
{your initials}with your actual initials
- replacing
Run
oc credentialsto get the credentials for the Jenkins instance.Open the pipeline to see it running
Inventory BFF
Create a new project from the Inventory Management BFF solution template named
inventory-management-bff-{initials}Clone the repository to your local machine
Log into the cluster from the command-line then register the pipeline
oc pipeline -n dev-{your initials}- replacing
{your initials}with your actual initials
- replacing
Run
oc credentialsto get the credentials for the Jenkins instance.Open the pipeline to see it running
Get the backend service name this value by executing the command `oc get svc -n dev-{initials}.
$ oc get svc -n dev-arNAME TYPE CLUSTER-IP EXTERNAL-IP PORT(S) AGEinventory-bff-ar ClusterIP 172.21.180.68 <none> 80/TCP 14minventory-svc-ar ClusterIP 172.21.4.95 <none> 80/TCP 20mUpdate the
connectsTovalue incharts/base/values.yamlto point to the kubernetes service of the microservice:connectsTo: inventory-svc-ar
- Commit and push the changesgit add .git commit -m "Update the connectsTo"git push
Inventory UI
Create a new project from the Inventory Management UI solution template named
inventory-management-ui-{initials}Clone the repository to your local machine
Log into the cluster from the command-line then register the pipeline
oc pipeline -n dev-{your initials}- replacing
{your initials}with your actual initials
- replacing
Open the pipeline to see it running
Get the bff service name this value by executing the command `oc get svc -n dev-{initials}.
$ oc get svc -n dev-arNAME TYPE CLUSTER-IP EXTERNAL-IP PORT(S) AGEinventory-bff-ar ClusterIP 172.21.180.68 <none> 80/TCP 14minventory-svc-ar ClusterIP 172.21.4.95 <none> 80/TCP 20mUpdate the
connectsTovalue incharts/base/values.yamlto point to the kubernetes service of the microservice:connectsTo: inventory-bff-arCommit and push the changes
git add .git commit -m "Update the connectTo"git pushVerify that the application is running