DevSecOps with Aquasec CSP
DevSecOps with Aquasec CSP
Guide
Aqua CSP provides full lifecycle security for your cloud native applications (containers, orchestrators, cloud VMs, and serverless functions) at a very granular level. Aqua includes preventive controls to secure the development pipeline; protects applications in runtime; detects and blocks attacks; and provides visibility and auditing for security risk management and compliance.
Aqua CSP:
- Integrates with your existing workflows for building, shipping, running, and securing your cloud workloads
- Works with the leading orchestrators and cloud provider platforms
- Secures environments consisting of servers running Linux and Windows, as well as CaaS and FaaS cloud services
- Provides you with full audit logs of security-related events that have occurred on your hosts or in your containers and serverless functions
Version
On IBM Managed Openshift 4.3 , the installation of Aqua CSP 4.6 was carried out
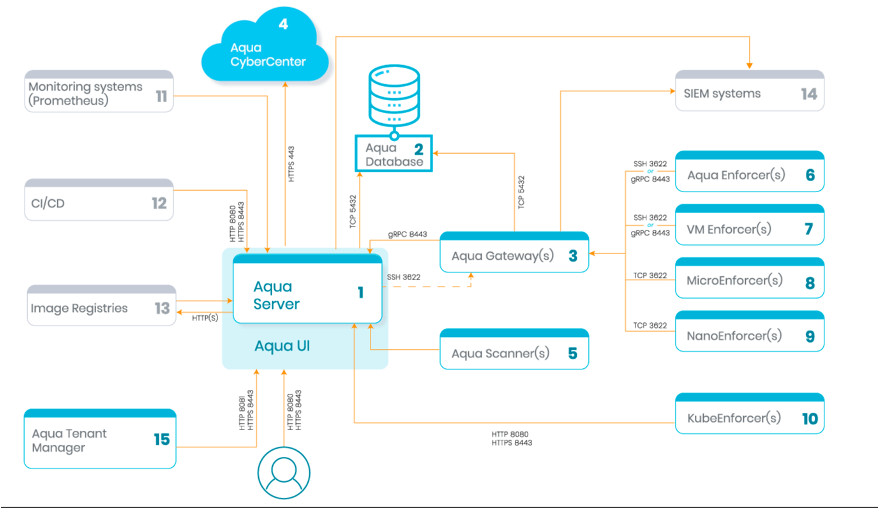
Architecture :
Key Features :
Aqua integrates within your development workflows (build, ship, and run phases) to provide full lifecycle security for your cloud workloads, running across VMs, container platforms, and serverless functions.
- Container Runtime Protection for protecting containers at runtime against malicious and unauthorized activities
- Image Assurance for assessing container images against vulnerabilities, malware, secrets, and security best practices
- Host Assurance for assessing VMs against vulnerabilities, malware, and security best practices (e.g., CIS benchmarks)
- Host Runtime Protection for protecting your VMs against malicious and unauthorized activities
- Function Assurance and Runtime Protection for serverless functions
- Network Micro-Segmentation using automated discovery and firewall rules for cloud workloads
- Monitor host logins, both successful and failed
- Vulnerability Shield™ (vShield), a virtual patch for vulnerabilities using a runtime policy that prevents vulnerability exploitation
Installation on IBM Cloud Managed Openshift v4.3 :
The Aqua Server components ( Server, DB Gateway ) are deployed as Pods and Services, while the Aqua Enforcer is deployed as a DaemonSet.
Installation Guide for AquaSec CSP on IBM Managed Openshift Cluster 4.3
Aqua CSP is installed on IBM Managed Openshift Cluster 4.3 leveraging the steps detailed out below
Make sure you have the following available:
- Your Aqua credentials: Username and password
- Your Aqua CSP License Token
1. Login into Openshift
Login in as an OpenShift with your token so you can run the oc adm commands:
oc login --token=<token> -server=https://c104-e.us-east.containers.cloud.ibm.com:31814
2. Create Aqua Project
The commands below will create a new OpenShift project (aqua) for the Aqua components
oc new-project aqua
3. Create a Service Account
Create the service account “aqua-sa” which will be used for assigning privileges to the aqua project
oc create serviceaccount aqua-sa -n aqua serviceaccount/aqua-sa created
4. Add cluster role and scc to account
Add cluster role for the “aqua-sa” service account
oc adm policy add-cluster-role-to-user cluster-reader system:serviceaccount:aqua:aqua-sa
Add security context constraints (scc) for the “aqua-sa” service account
oc adm policy add-scc-to-user privileged system:serviceaccount:aqua:aqua-sa
oc adm policy add-scc-to-user hostaccess system:serviceaccount:aqua:aqua-sa
5. Create Aqua registry secret
Set up OpenShift secrets called “aqua-registry”
oc create secret docker-registry aqua-registry --docker-server=registry.aquasec.com –docker-username=<AQUA_USERNAME> --docker-password=<AQUA_PASSWORD> --dockeremail=no@email.com -n aqua
Replace <AQUA_USERNAME> and <AQUA_PASSWORD> with the credentials
#you have received from Aqua Security.
6. Add the “aqua-registry” secret to the “aqua-sa” service account
oc secrets add aqua-sa aqua-registry --for=pull -n aqua
7. Create the database password secret
Create the database password secret. Replace <DB_PASSWORD> with the password of your choice. This needs to be done for both managed or internal DBs. Set up OpenShift secret called “aqua-db”.
oc create secret generic aqua-db –-from-literal=password=<dbpasDB_PASSWORDsword> -n aqua
8. Create Cluster Role and Role Bindings
To search and scan images from an OpenShift integrated registry,deploy these manifest files
oc create -f cluster-role.yaml
oc create -f cluster-role-binding.yaml
9. Deploy CSP component : DB
To deploy an internal DB (not recommended for production usage)
Create persistent storage for the DB
oc create -f aqua-db-pvc.yaml
Check that PVC is created successfully by running
oc get pvc
Now that PVC is created successfully , go ahead with the db deployment
oc create -f db-deployment-vis.yaml
Check the deployment is successful by running
oc get pods
Create a service for the DB
oc create -f db-service.yaml
Check service is created successfully
oc get svc
10. Deploy the Aqua Server
Create persistent storage for the Server
oc create -f aqua-web-pvc.yaml
Check that PVC is craeted successfully
oc get pvc
Create Server Deployment
oc create -f server-deployment.yaml
Create a service for the Server
oc create -f server-service.yaml
Check service is created successfully
oc get svc
Next create a route for the Server
oc create -f server-route.yaml
11. Deploy the Aqua Gateway
Create the Gateway Deployment
oc create -f gatewaydeployment.yaml
Create the Gateway Service
oc create -f gatewayservice.yaml
12. Check the deployment
Run the below command to check the status of all deployments
oc status
Example Output
Smiths-MBP-d81f:4. aqua gateway smith$ oc statusIn project aqua on server https://c104-e.useast.containers.cloud.ibm.com:31814svc/aqua-db - 172.21.109.50:5432deployment/aqua-db deploys registry.aquasec.com/database:4.6 deployment #1 running for about an hour - 1 podsvc/aqua-gateway - 172.21.215.125 ports 8443, 3622deployment/aqua-gateway deploys registry.aquasec.com/gateway:4.6
13. Login into Aqua CSP console
You need to point your web browser to the IP address or DNS name of the Aqua Server.
Run the command below to get the IP address or DNS name of the Aqua Server.
oc get route/aqua-web -n aqua
The Aqua Server IP address or DNS name will appear as shown under HOST/PORT, as seen in this example:
NAME HOST/PORTPATH SERVICES PORT TERMINATION WILDCARDaqua-web aqua-web-aqua.gsi-learning-ocp437ec5d722a0ab3f463fdc90eeb94dbc70-0000.us-east.containers.appdomain.cloud aqua-web 8080 None
Login to this address or DNS name, as shown in this example (port number is not required):
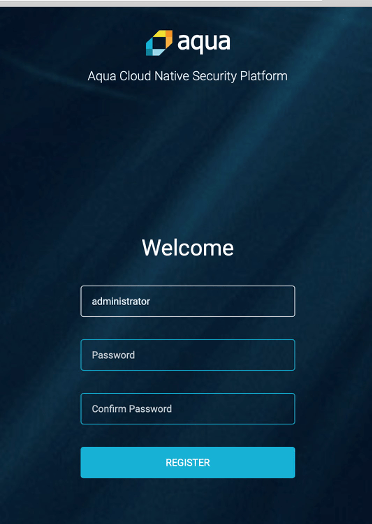
You should see the screen shown below. When you access the Aqua Server for the first time, you must enter and confirm the password for the administrator username.
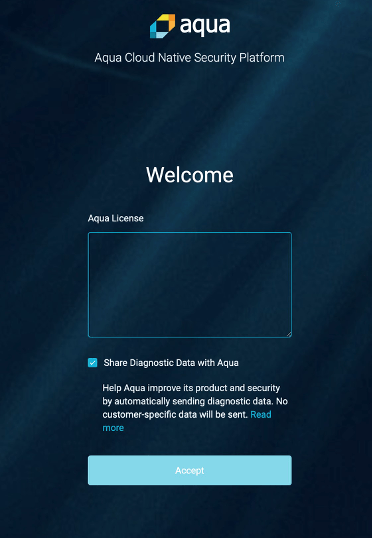
Apply license information which you would have received from the link https://success.aquasec.com/#/licenses and click Accept
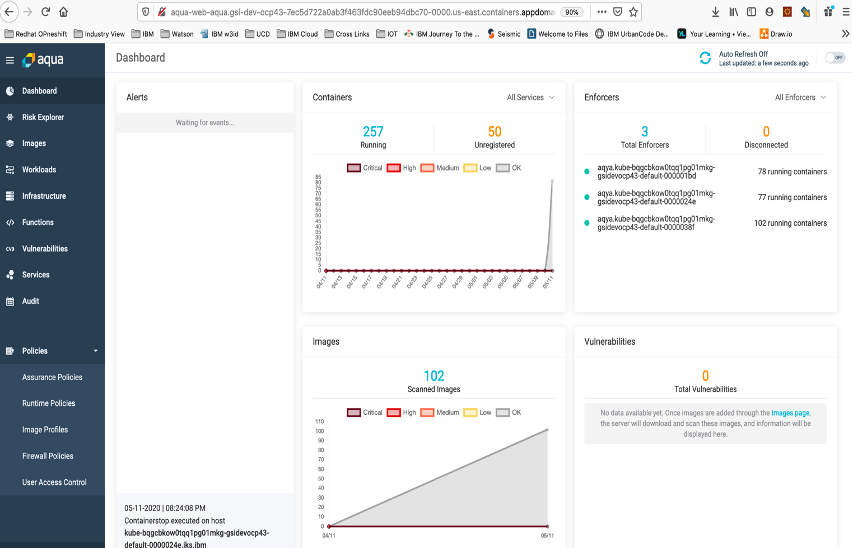
You are now logged in as administrator. The Aqua Dashboard will be displayed similarly to the screenshot below:
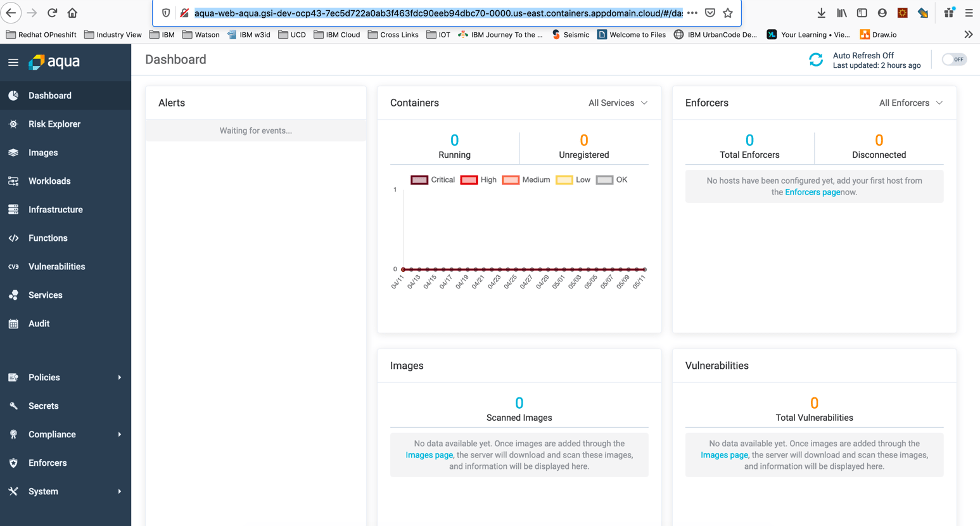
In the Aqua UI: Navigate to System > Aqua Gateways. You should see that the Aqua Gateway is connected (green).

14. Install the Enforcers
By default, the Aqua Enforcer runs as a privileged container. Deploy Aqua Enforcers across your OpenShift cluster by using a Kubernetes DaemonSet, which automatically deploys a single Aqua Enforcer container on each node in your cluster.
Enforcer group is a set of zero or more Aqua Enforcers with the same configuration.
Click on Enforcers – click on “Add Enforcer Group”
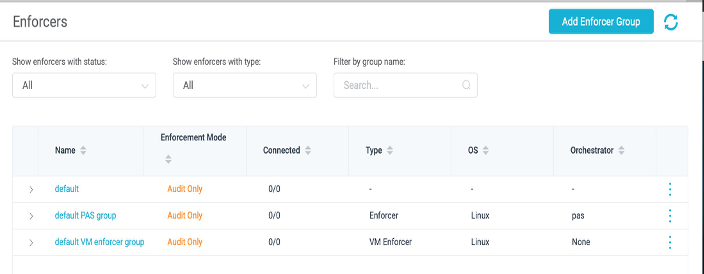
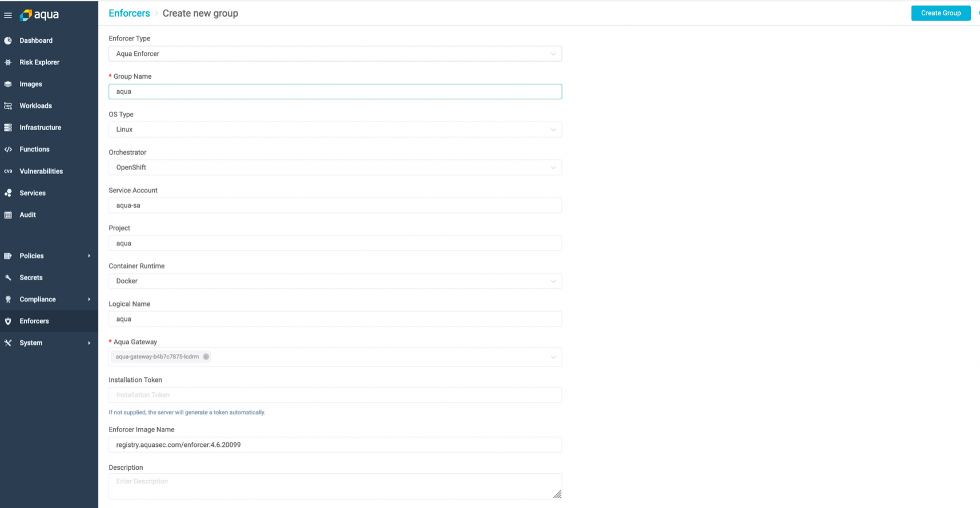
On the Aqua UI go to Enforcers > Create new group screen that appears, fill in the settings as shown
- Orchestrator: OpenShift
- Service Account: aqua-sa
- Project: aqua
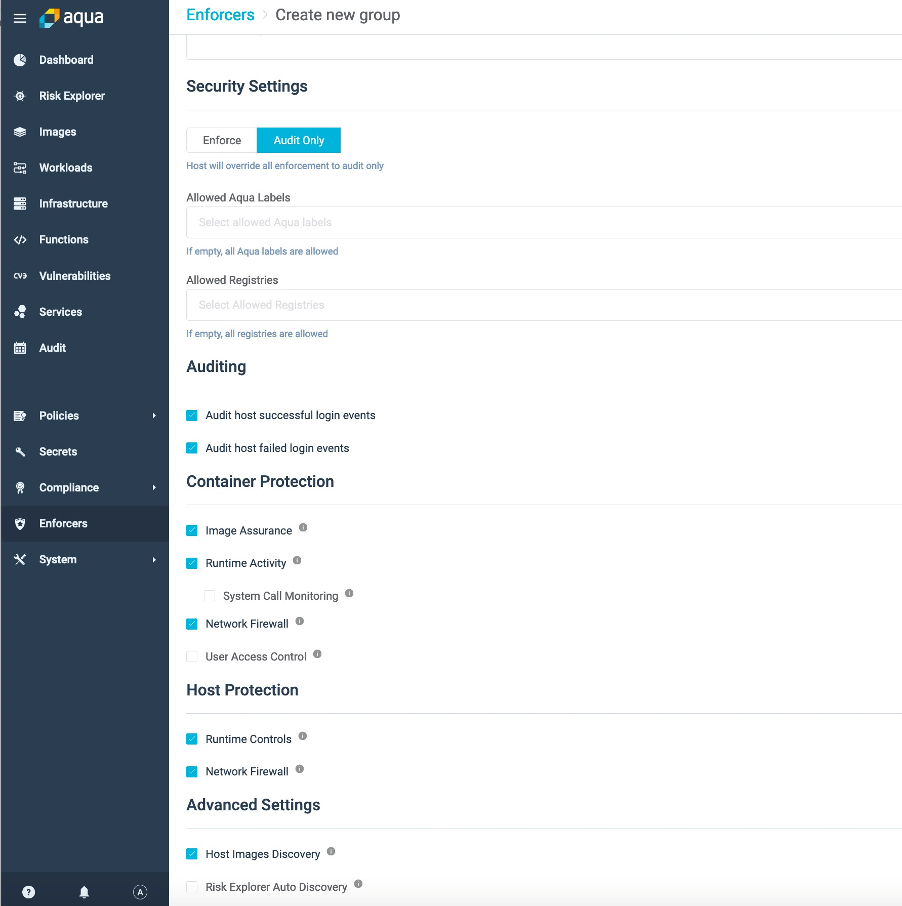
Next fill up the security settings
Click Create Group. You will see a pop-up window titled “Install Command”,
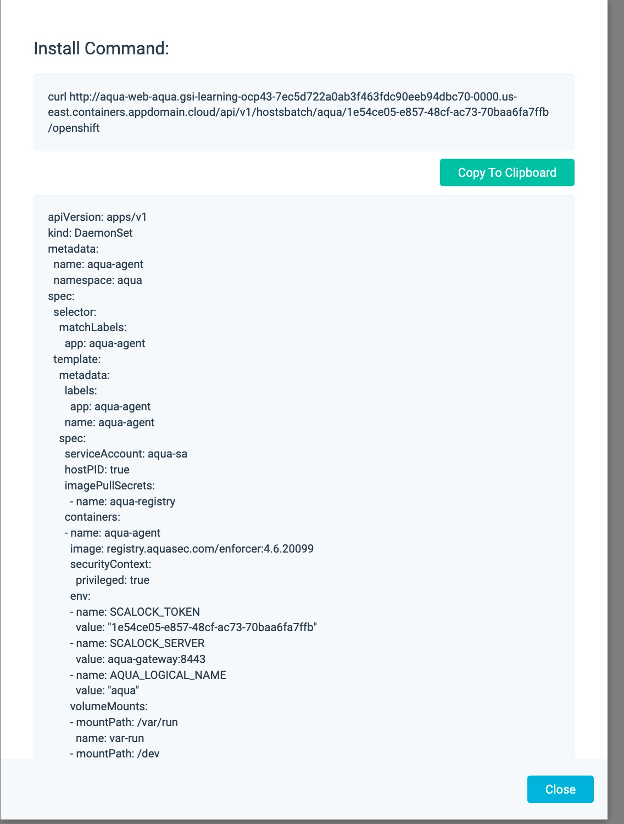
And then click on Install Command
Scroll to the bottom of the screen, and click Copy to Clipboard to copy the DaemonSet YAML text to the clipboard. Save the text as the file aqua-enforcer-new-43.yaml on your host and Click Close.
15. Deploy the Enforcers
A byproduct of the Enforcer group creation is the DaemonSet required for OpenShift. Aqua does not automatically deploy the Enforcer on the host; you do this with the oc create command. You can run this command to deploy Enforcers on one or more hosts.
oc create -f aqua-enforcer-new-43.yaml
Check that the daemon set is created successfully.
oc get ds
Now that we have daemonsets running ,The enforcers are now available :

16. Check the Aqua CSP Dashboard
The dashboard now has data populated based on containers on cluster.
CI/ CD leveraging Jenkins - Jenkins Configuration for AQUA CSP
You can use the Aqua Security Scanner plugin for Jenkins to scan images in the build pipeline in order to find vulnerabilities. You can also scan images that have been pushed to a registry. This plugin is installed in Jenkins. Once installed, you include details for scanning the image in the build process. During the build process, the image is scanned by the scanner and, optionally, actions are taken if the scan results are negative. Scanning results can be viewed in Jenkins.
During the build process, the image is scanned by the scanner and, optionally, actions are taken if the scan results are negative. Scanning results can be viewed in Jenkins.
Jenkins Plugin Installation & Configuration
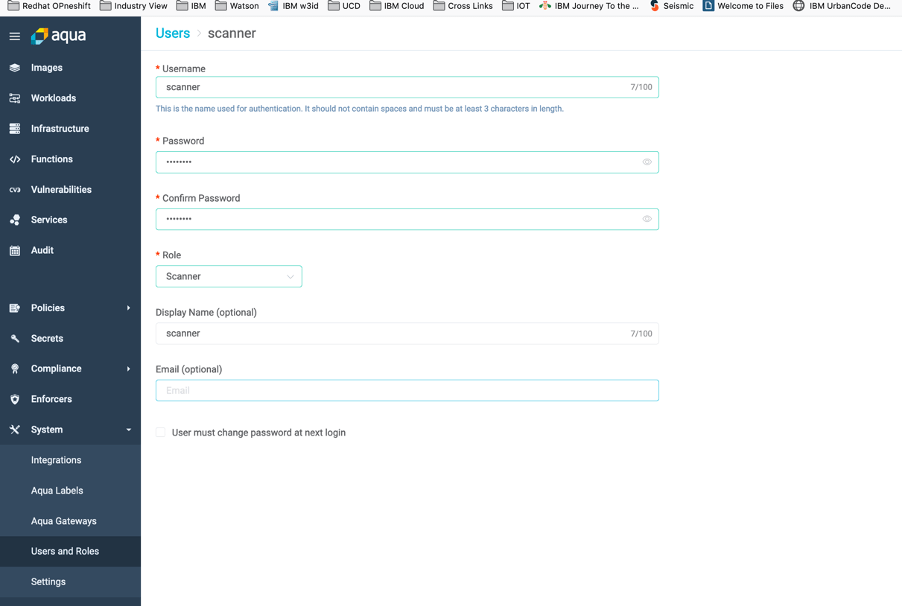
1. Add user with role scanner
- In the Aqua UI: Navigate to System > Users and Roles.
- Click Add Users. Enter details for a new user, with role Scanner.
2. Install and configure the Jenkins plugin
In Jenkins: Select Manage Jenkins and then select Manage Plugins from the list. Make sure that the list of available plugins is up to date.
Install the Jenkins plugin
- In Jenkins: Select Manage Jenkins -> Manage Plugins
- Select the Available tab, search for “Aqua Security Scanner”, and select it.
- Click Install without restart. This will install the plugin

Check the plugin is successfully installed

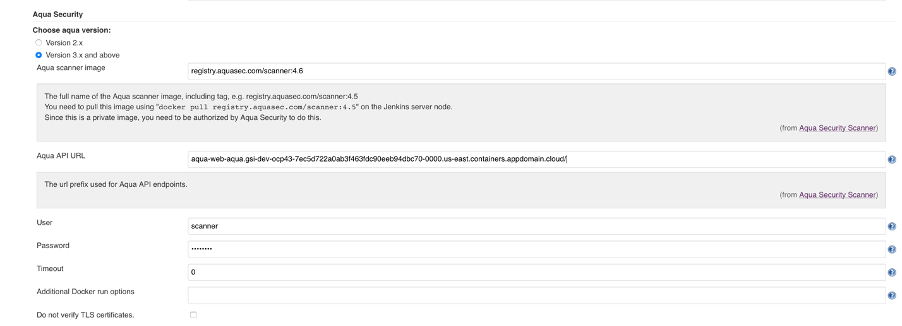
3. Configure the Jenkins plugin
In Jenkins:
- Select Manage Jenkins, then select Configure System.
- In the Aqua Security section and fill in the following fields: the scanner image, Aqua Server URL, scanner user created in Aqua in the previous step, and the password.
- You can also optionally specify the scan timeout (where 0 means unlimited) and include additional docker run options (for example: if you want to run the scanner with —privileged parameters you can add it here).
- Select “Do not verify TLS certificates” if you are working in an environment (such as a development environment) without certificates.
4. Obtain the Aqua scanner binary Download the scanner image on Jenkins machine
docker login registry.aquasec.com -u smith_naik@in.ibm.com -p <your-aqua-password>
docker pull registry.aquasec.com/scanner:4.6
Jenkins Freestyle project - Scan via Aqua CSP
You can use the plugin for Jenkins in the build process in Freestyle jobs. You can configure the job to scan images during the build process, or after the build completes and the image is pushed to a registry.
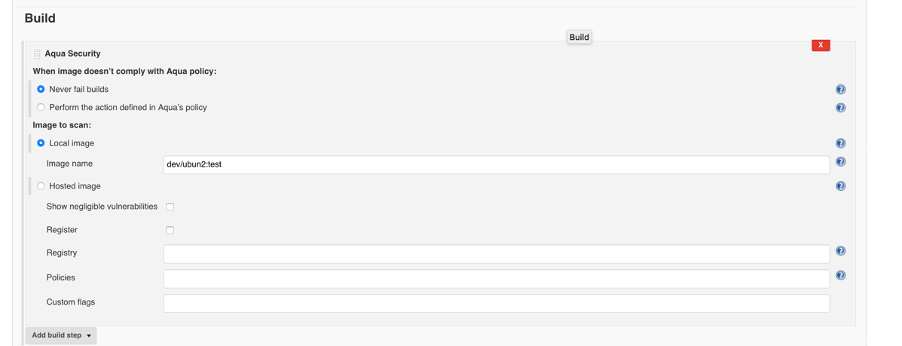
In the Configure page for a job, click Add Build Step Select “Aqua Security”.
Select the action to be taken when image doesn’t comply with Aqua policy. The option “Perform the action defined in Aqua’s policy” refers to the action specified in the Image Assurance Policy
Select the image to be scanned.
If the image is local (not in a registry), select Local image, and enter the image name. If the image is in a registry, select Hosted image, and enter the URL for the registry and the image name.
Locally hosted images will be scanned with the Default Image Assurance Policy. Images hosted in a registry will be scanned with all Image Assurance Policies that are applicable (according to the scope of the policy)
After you run the build , the console will show output like this:
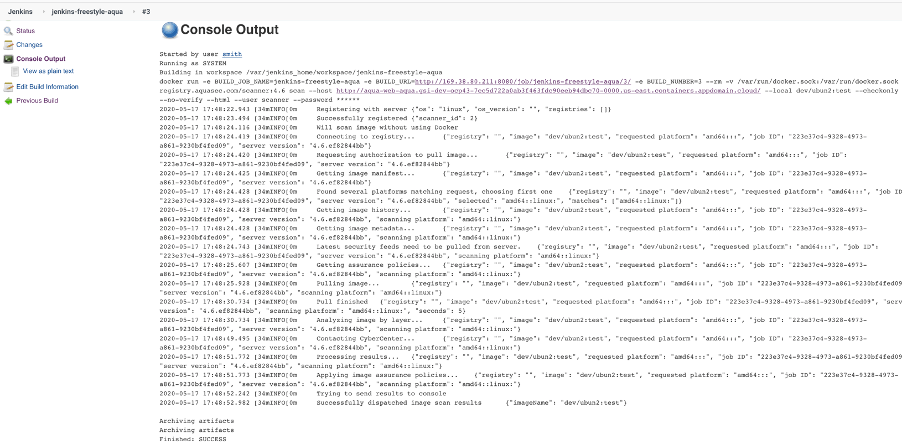
You can also see results of the scan as an HTML page. In the Jenkins build menu, select Aqua Security Scanner, and then select the job whose results you wish to see. The results will appear like this.
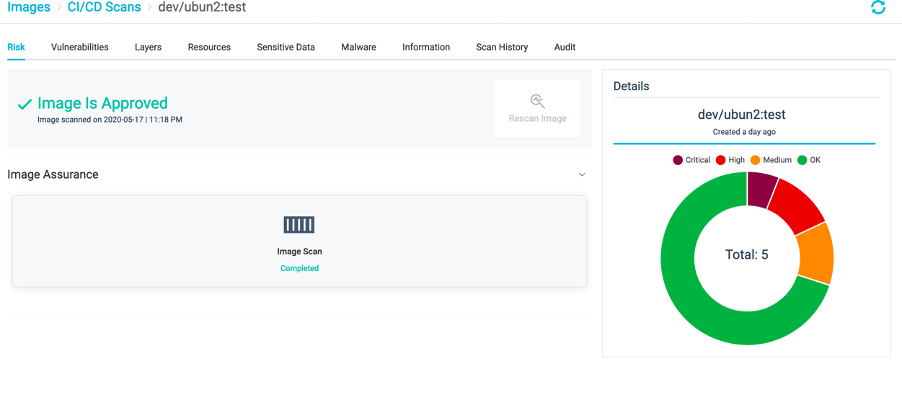
Also on Aqua CSP , you can see the Images ->CI/CD scans

Drill down
Jenkins Freestyle project - Scan via Aqua CSP
You can use the plugin for Jenkins in the build process in Pipeline jobs. You can configure the job to scan images during the build process, or after the build completes and the image is pushed to a registry.
In Pipeline jobs, the build step for Aqua scanning is included in a pipeline script, as part of the job configuration.
- In Jenkins, in the Configure page for a job, scroll to the Pipeline section.
- To scan a locally hosted image, include a snippet such as this in the pipeline script.
- Replace the localImage parameter value with the identifier of the actual image in your pipeline.
You may also use the Jenkins Snippet Generator. Click Pipeline Syntax to get started:
Enter details for the image, and then click Generate Pipeline Script. Copy this to the pipeline script.