DevSecOps with Trivy
Integrating Aquasec Trivy in in CICD Pipeline for DevSecOps
Overview
DevSecOps ensures the security by doing Vulnerability scanning on the container images. There are several tools available for image scanning.
Trivy is a Simple and Comprehensive Vulnerability Scanner for Containers, Suitable for CI.
The more information on Trivy is available in https://github.com/aquasecurity/trivy
Working with Trivy Commands
Installation
Trivy installation is very simple. You can use homebrew on macOS to install
$ brew install aquasecurity/trivy/trivy
Trivy Standalone Run
Trivy can be run as standalone in Desktop or in laptop .
$ trivy [YOUR_IMAGE_NAME]$ trivy python:3.4-alpine
Output
2020-06-23T23:11:07.297+0530 INFO Detecting Alpine vulnerabilities...python:3.4-alpine (alpine 3.9.2)================================Total: 15 (UNKNOWN: 0, LOW: 1, MEDIUM: 10, HIGH: 4, CRITICAL: 0)+---------+------------------+----------+-------------------+---------------+--------------------------------+| LIBRARY | VULNERABILITY ID | SEVERITY | INSTALLED VERSION | FIXED VERSION | TITLE |+---------+------------------+----------+-------------------+---------------+--------------------------------+
Trivy Docker Run
Trivy can be run from Docker.
$ docker run --rm -v [YOUR_CACHE_DIR]:/root/.cache/ aquasec/trivy [YOUR_IMAGE_NAME]$ docker run --rm -v $HOME/Library/Caches:/root/.cache/ aquasec/trivy python:3.4-alpine
Trivy Results as JSON
Trivy output can be generated as json.
$ trivy -f json -o results.json python:3.4-alpine
Filter vulnerabilities by severities
Vulnerability results can be filtered. In the below example HIGH and CRITICAL issues are displayed
$ trivy --severity HIGH,CRITICAL python:3.4-alpine
python:3.4-alpine (alpine 3.9.2)================================Total: 4 (UNKNOWN: 0, LOW: 0, MEDIUM: 0, HIGH: 4, CRITICAL: 0)+---------+------------------+----------+-------------------+---------------+--------------------------------+| LIBRARY | VULNERABILITY ID | SEVERITY | INSTALLED VERSION | FIXED VERSION | TITLE |+---------+------------------+----------+-------------------+---------------+--------------------------------+| bzip2 | CVE-2019-12900 | HIGH | 1.0.6-r6 | 1.0.6-r7 | bzip2: out-of-bounds write in |
Trivy Run - Exit Code
Exit code can be used to break the build based on condition.
This is useful while using Trivy in CICD
Stop Build
Build stops, when CRITICAL and HIGH severities are found.
$ trivy --exit-code 1 --severity CRITICAL,HIGH python:3.4-alpine
Continue Build
Build doesn’t stop, when MEDIUM and LOW found.
$ trivy --exit-code 0 --severity MEDIUM,LOW python:3.4-alpine
Integrating Trivy with Jenkins and Tekton`
Lets integrate the Trivy in Jenkins and Tekton pipelines of Cloud Native Toolkit
Create an App using Deploy First App.
Make changes to the
JenkinsorTektonpipelines as given below.
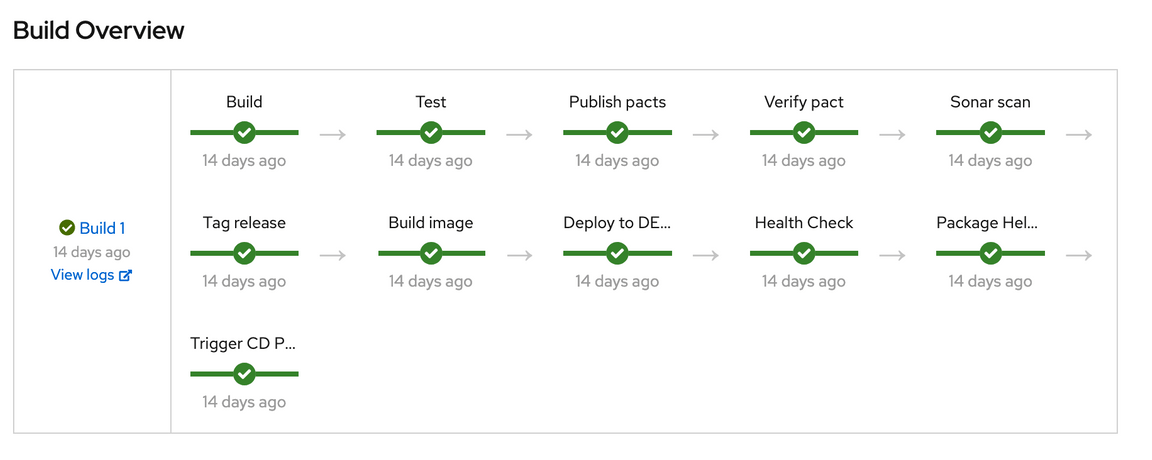
The CICD process contains several steps. There is a step called Build Image that will build a image and Push the image to the image registry.

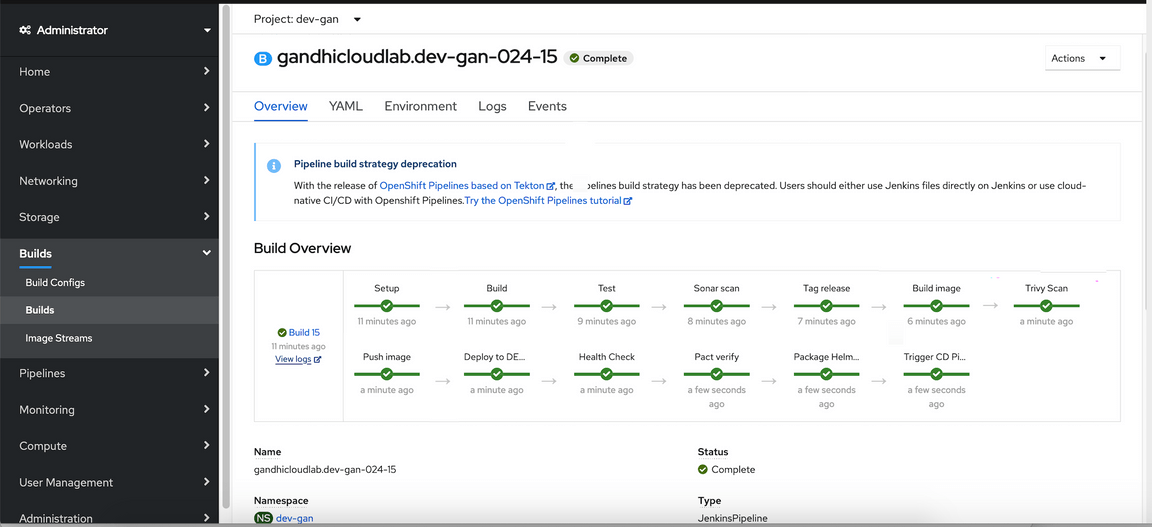
Need to split the step into 3 steps.
- Build Image
- Trivy Scan
- Push Image
The modified pipeline should look like this.

Build Image
The build image will build the image.
Trivy Scan
Trivy scan will scan the image and print the Vulnerability count as Low, Medium, High and Critical. Based on the configured exit criteria (0 Critical) the next step would in the pipeline will continue.
Push Image
After the scan is completed, it Pushes the image to the Image Registry.
The pipeline scripts are defined in the jenkinsfile. lets us see the changes done in the jenkins file.
Jenkinsfile Changes
Declaration
The below code snippet is the declaration about Trivy image, to be added in the containers section under podTemplate in the jenkinsfile
```- name: trivyimage: docker.io/aquasec/trivytty: truecommand: ["/bin/sh"]workingDir: ${workingDir}securityContext:privileged: trueenvFrom:
name-trivywill be used in the script to refer the trivy container.image- image tag of thetrivy.configMapRef- A configmap containsusernamedetails to connect to IBM Cloud Container registry.secretRefA secrte containspasswordto connect to IBM Cloud Container registry.
Build Image
Here are the steps to Build Image. Replace the existing content under the container(name: 'buildah'
container(name: 'buildah', shell: '/bin/bash') {stage('Build image') {sh '''#!/bin/bashset -e. ./env-configecho TLSVERIFY=${TLSVERIFY}echo CONTEXT=${CONTEXT}IMAGE_VERSION="0.0.1"
The variable
APP_IMAGE=contains the Temp image name.Image is build using
buildahand tagged with temp image name.Login into IBM Cloud Container Registry using
buildah.Temp image is pushed to IBM Cloud Container Registry using
buildah.
Trivy Scan
The below code snippet is for trivy Scanning. Add the below code under the previous step `Build Image’
container(name: 'trivy', shell: '/bin/sh') {stage('Trivy Scan') {sh '''#!/bin/shset -e. ./env-configecho TLSVERIFY=${TLSVERIFY}
The temporary image is scanned here.
TRIVY_AUTH_URL,TRIVY_USERNAME,TRIVY_PASSWORDrefers the Registry URL and user details to login into IBM Cloud Container Registry by trivy.trivy --exit-code 1 --severity CRITICAL ${APP_IMAGE_Temp}- step scans the temp image available in the IBM Cloud Container Registry.The step stops and then the pipeline also stops when there is a CRITICAL issue found.
If you don’t want to stop the pipeline though the CRITICAL issue is found then replace the above triy scan line with
trivy ${APP_IMAGE_Temp}.The scan results will be printed in the console.
Push Image
The below code snippet is for Pushing Image. Add the below code under the previous step `Trivy Scan’
container(name: 'buildah', shell: '/bin/bash') {stage('Push image') {sh '''#!/bin/bashset -e. ./env-configecho TLSVERIFY=${TLSVERIFY}echo CONTEXT=${CONTEXT}IMAGE_VERSION="0.0.1"
The code snippet does the followings.
Login into IBM Cloud Container Registry using
buildah.Pull the temp image using
buildah.Tag the image to the actual image name.
Push the actual image to IBM Cloud Container Registry using
buildah.Remove the temp image from IBM Cloud Container Registry using
buildah.
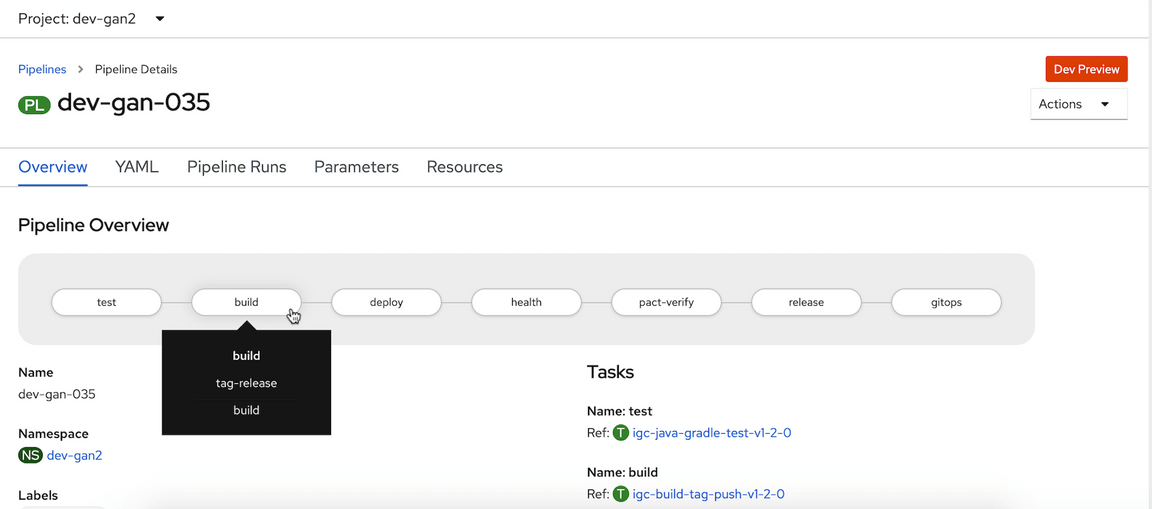
The CICD process contains several steps. There is a step called Build that will build a image and Push the image to the image registry.

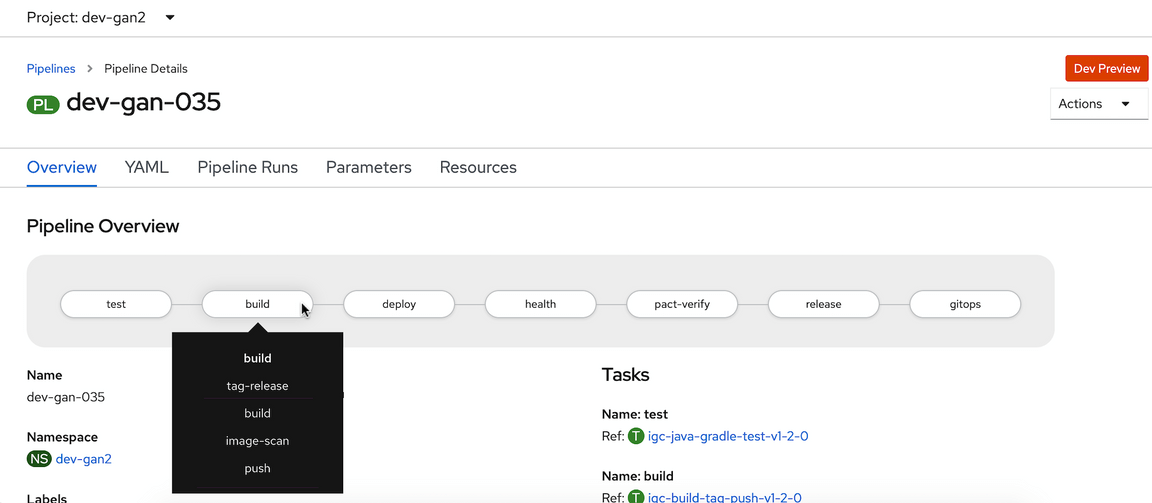
Need to split the step into 3 steps.
- build
- image-scan
- push
The modified pipeline should look like this.

build
The build image will build the image.
image-scan
Image scan will scan the image and print the Vulnerability count as Low, Medium, High and Critical. Based on the configured exit criteria (0 Critical) the next step would in the pipeline will continue.
push
After the scan is completed, it Pushes the image to the Image Registry.
The pipeline scripts are defined as Task in the yaml file. lets us see the changes done in the task file.
Tekton Task Changes
Declaration
Add the below code code snippet as declaration about the Trivy image in the Task
- default: docker.io/aquasec/trivyname: trivytype: string
- After adding the Task code should be like this.
- Replace the namespace
dev-gan2, with your project namespace.
apiVersion: tekton.dev/v1alpha1kind: Taskmetadata:name: igc-build-tag-push-v1-2-0namespace: dev-gan2spec:inputs:params:- default: docker.io/node:12-stretch
Build Image
Add the below code snippet in the Task for building image
- args:- -c- |set -e. ./env-configIMAGE_URL=$(outputs.resources.image.url)
- Temp image is build using
buildah - Login into IBM Cloud Container Registry using
buildah. - Temp image is pushed to IBM Cloud Container Registry using
buildah. - env
REGISTRY_USERcontains Username details to Login into IBM Cloud Container Registry. - env
REGISTRY_PASSWORDcontains Password details to Login into IBM Cloud Container Registry. name: buildrefers the name of the step
Image Scan
Add the below code code snippet in the Task for trivy scanning.
- args:- -c- |set -e. ./env-configIMAGE_URL=$(outputs.resources.image.url)
The temporary image is scanned here.
TRIVY_AUTH_URL,TRIVY_USERNAME,TRIVY_PASSWORDrefers the Registry URL and user details to login into IBM Cloud Container Registry by trivy.trivy --exit-code 1 --severity CRITICAL ${APP_IMAGE_Temp}- step scans the temp image available in the IBM Cloud Container Registry.The step stops and then the pipeline also stops when there is a CRITICAL issue found.
If you don’t want to stop the pipeline though the CRITICAL issue is found then replace the above triy scan line with
trivy ${APP_IMAGE_Temp}.The scan results will be printed in the console.
Push Image
Add the below code code snippet in the Task for pushing image.
- args:- -c- |set -e. ./env-configIMAGE_URL=$(outputs.resources.image.url)REGISTRY_URL=$(echo $IMAGE_URL | awk -F / '{print $1}')
The code snippet does the followings.
Login into IBM Cloud Container Registry using
buildah.Pull the temp image using
buildah.Tag the image to the actual image name.
Push the actual image to IBM Cloud Container Registry using
buildah.Remove the temp image from IBM Cloud Container Registry using
buildah.