DevSecOps with Twistlock
Prisma Cloud Compute Edition (Twistlock)
Guide
Prisma™ Cloud is a cloud security posture management (CSPM) and cloud workload protection platform (CWPP) that provides comprehensive visibility and threat detection across your organization’s hybrid, multi-cloud infrastructure.
For securing your host, container, and functions across the application lifecycle , Prisma Cloud is available as:
Prisma Cloud Compute Edition, which is is the downloadable, self-hosted software that you can use to protect hosts, containers, and serverless functions running in any cloud, including on-premises and even fully air-gapped environments. You must deploy and operate the Console and Defenders in your own environment.
Prisma Cloud Compute, which is the SaaS version of the full Cloud Native Security Platform that delivers host, container, and serverless capabilities along with the cloud security posture management capabilities. Palo Alto Networks operates the Console for you, and you must deploy the agents (Defenders) into your environment to secure hosts, containers, and serverless functions running in any cloud, including on-premises.
Version
On IBM Managed Openshift 4.3 , the installation of Prisma Cloud Compute Edition 20.4 was carried out as part of this study.
Architecture :
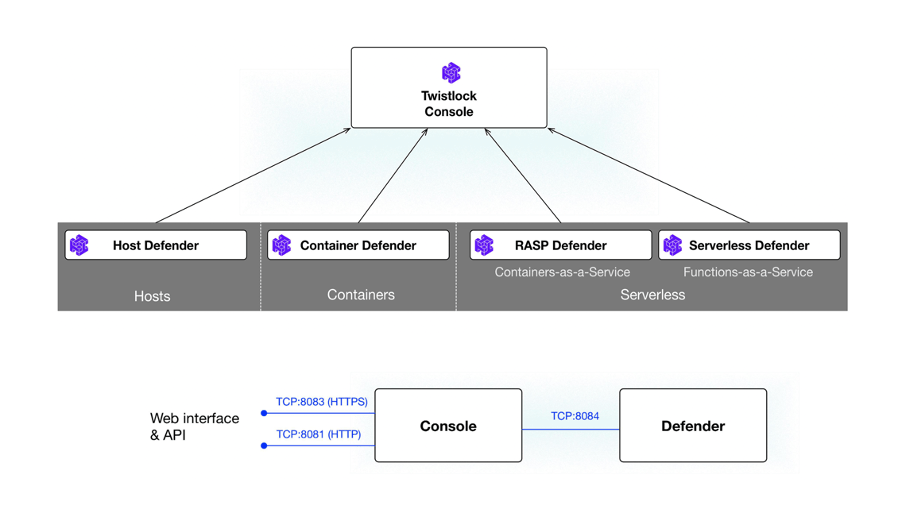
Prisma Cloud consists of a central management interface, called Console, security agents called Defender, a threat intelligence service, and ancillary tools and plugins.
Console is Prisma Cloud’s management interface. It lets you define policy and monitor your environment. Console is delivered as a container image.
Defender protects your environment according to the policies set in Console. There are a number of Defender types, each designed to protect a specific resource type.
The Prisma Cloud Intelligence Stream is a real-time threat feed delivered from the Prisma Cloud content delivery network (CDN) to our customers’ installations. This service gathers, analyzes, and prepares threat data for distribution to the Console located on your network. Console pulls data down from the Threat Intelligence Stream using HTTPS requests. The Intelligence Stream is Console’s only required external dependency.
The twistcli tool is a command-line control and configuration tool. It ships with your Prisma Cloud release and can be found in the Prisma Cloud release tarball. Support is provided for both Linux and MacOs. The twistcli tool provides a number of functions:
* Scanning images for vulnerabilities and compliance issues. This is useful when you’re building custom tooling, or when you’re using a CI tool for which Prisma Cloud does not provide a native plugin.* Deploying (installing and uninstalling) Console and Defender across all environments.Downloading the latest threat data from the Intelligence Stream for transfer to an air-gapped environment.Packaging log files and other relevant data from your environment and optionally uploading that data so that Prisma Cloud Support can help debug issues.
Installation on IBM Cloud Managed Openshift v4.3 :
Prisma Cloud software consists of two components: Console and Defender.
Install Prisma Cloud in two steps. First, install Console. Then install Defender.
Prisma Cloud Console is deployed as a ReplicationController, which ensures it’s always running. Prisma Cloud Defenders are deployed as a DaemonSet, which ensures that an instance of Defender runs on every node in the cluster. You can run Defenders on OpenShift master and infrastructure nodes using node selectors.
OpenShift, offer DaemonSets, which guarantee that an agent runs on every node in the cluster. Prisma Cloud Defender, therefore, is deployed in Kubernetes and OpenShift clusters as a DaemonSet.
Installation Guide for Prisma Cloud Compute(Twistlock) on IBM Managed Openshift Cluster 4.3
Prisma Cloud Console is deployed as a ReplicationController, which ensures it’s always running. Prisma Cloud Defenders are deployed as a DaemonSet, which ensures that an instance of Defender runs on every node in the cluster. You can run Defenders on OpenShift master and infrastructure nodes using node selectors.
1.Login into Openshift cluster v4.3
Login in as an OpenShift with your token so you can run the oc adm commands:
oc login --token=<token> --server=https://c100-e.us-east.containers.cloud.ibm.com:30223
2. Create Twistlock Project
The commands below will create a new OpenShift project (twistlock) which will house all the Twistlock components.
oc new-project twistlock
3. Determine the Service for your OpenShift internal registry
oc get svc -n openshift-image-registry
Results:
NAME TYPE CLUSTER-IP EXTERNAL-IP PORT(S) AGEimage-registry ClusterIP 172.21.98.28 <none> 5000/TCP 16dimage-registry-operator ClusterIP None <none> 60000/TCP 16d
4. Determine the endpoint for your OpenShift internal registry
oc get routes -n openshift-image-registry
Results:
NAME HOST/PORT PATH SERVICES PORT TERMINATION WILDCARDdocker-registry docker-registry-openshift-image-registry.gsi-dev-ocp43-7ec5d722a0ab3f463fdc90eeb94dbc70-0000.us-east.containers.appdomain.cloud image-registry 5000-tcp passthrough None
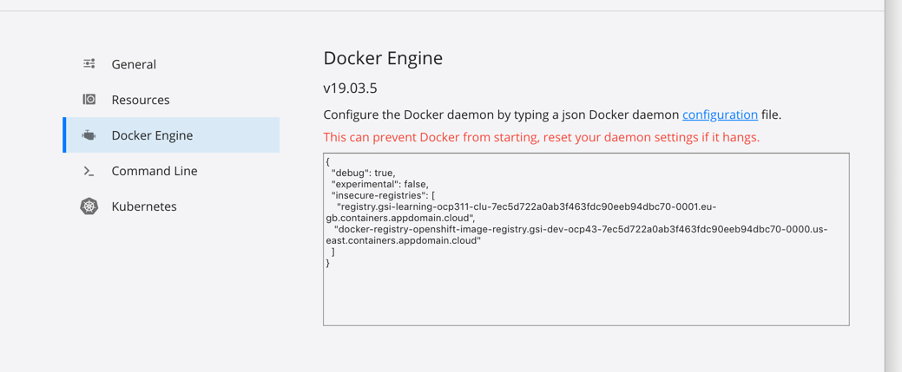
5. Add entry in the local Docker Engine
In Docker Engine on local machine from which installation is being executed, add the registry as insecure-registries as below :
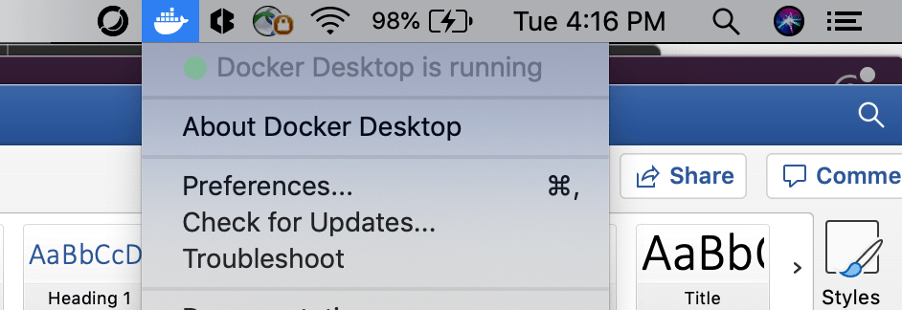
• Add the entry of registry route captured in previous Step
6. Docker Login to Openshift registry
docker login docker-registry-openshift-image-registry.gsi-dev-ocp43-7ec5d722a0ab3f463fdc90eeb94dbc70-0000.us-east.containers.appdomain.cloud -u $(oc whoami) -p $(oc whoami -t)
7. Pull the Twistlock Defender and Console Images
Images for both console and defender are pulled from Prisma Cloud Registry using licensed access token
docker pull registry-auth.twistlock.com/tw_<access-code>/twistlock/defender:defender_20_04_163
docker pull registry-auth.twistlock.com/tw_<access-code>/twistlock/console:console_20_04_163
8. Tag the images for Openshift internal Registry
docker tag registry-auth.twistlock.com/tw_<access-code>/twistlock/defender:defender_20_04_163 docker-registry-openshift-image-registry.gsi-dev-ocp43-7ec5d722a0ab3f463fdc90eeb94dbc70-0000.us-east.containers.appdomain.cloud/twistlock/private:defender_20_04_163
docker tag registry-auth.twistlock.com/tw_<access-code> /twistlock/console:console_20_04_163 docker-registry-openshift-image-registry.gsi-dev-ocp43-7ec5d722a0ab3f463fdc90eeb94dbc70-0000.us-east.containers.appdomain.cloud/twistlock/private:console_20_04_163
9. Check the images tagged successfully
docker images |grep twistlock
10. Push the images to Twistlock project’s image stream
docker push docker-registry-openshift-image-registry.gsi-dev-ocp43-7ec5d722a0ab3f463fdc90eeb94dbc70-0000.us-east.containers.appdomain.cloud/twistlock/private:defender_20_04_163
docker push docker-registry-openshift-image-registry.gsi-dev-ocp43-7ec5d722a0ab3f463fdc90eeb94dbc70-0000.us-east.containers.appdomain.cloud/twistlock/private:console_20_04_163
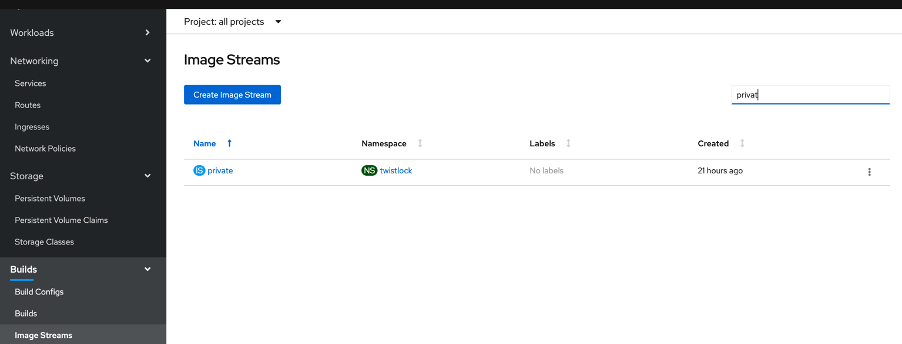
11. Check that Image is pushed successfully
oc get imagestreams --all-namespaces | grep -i twistlock
or From Console, under Builds -> Image Streams search for “private”
12. Navigate to Location where the installer is unzipped for the twistcli
The twistcli tool generates YAML for a ReplicationContoller, and other service configurations, such as a PersistentVolumeClaim, SecurityContextConstraints, and so on
13. Generate the Deployment twistlock_console.yaml file
./osx/twistcli console export openshift --storage-class "ibmc-block-gold" --image-name "image-registry.openshift-image-registry.svc:5000/twistlock/private:console_20_04_163" --service-type "ClusterIP"
Result
Saving output file to /Users/smith/Documents/Cloud Hybrid Squad /Devsecops/PrismaCompute/prisma_cloud_compute_edition_20_04_163/twistlock_console.yaml
14. Deploy Console
oc create -f ./twistlock_console.yaml
Result:
configmap/twistlock-console createdservice/twistlock-console createdserviceaccount/twistlock-console createdpersistentvolumeclaim/twistlock-console createdsecuritycontextconstraints.security.openshift.io/twistlock-console createddeployment.apps/twistlock-console createdError from server (AlreadyExists): error when creating "./twistlock_console.yaml": namespaces "twistlock" already exists
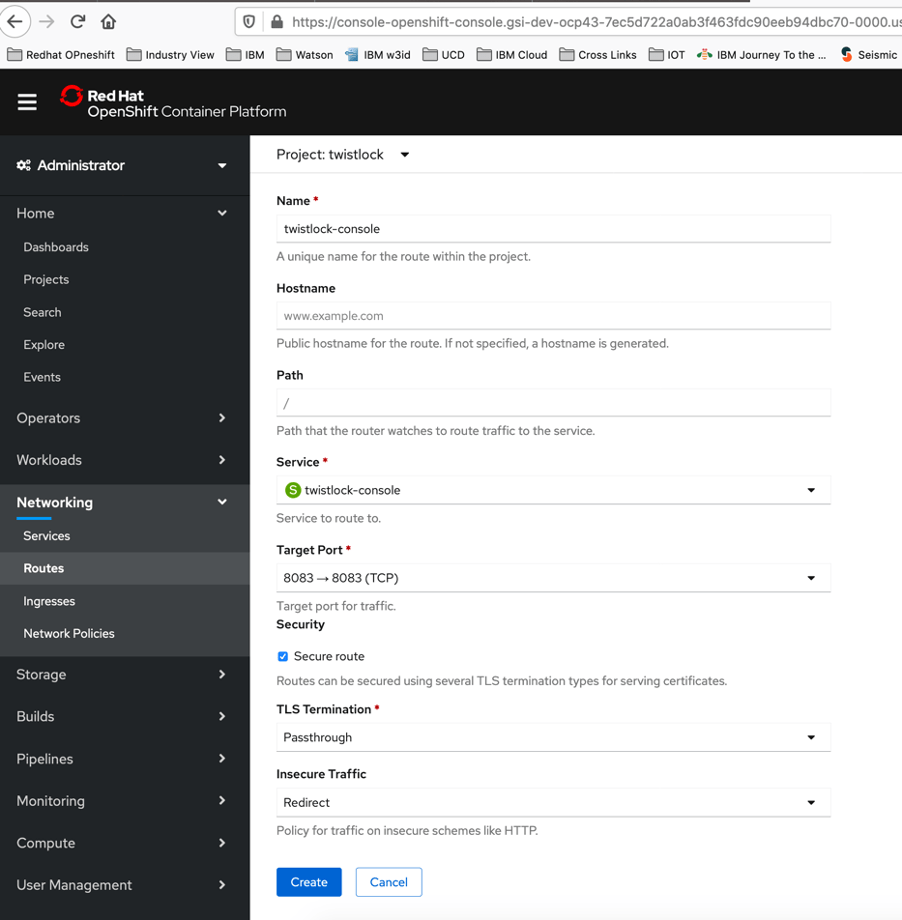
15. Create an external route to Console
From the OpenShift web interface, go to the twistlock project.
- Go to Networking > Routes
- Select Create Route
- Enter a name for the route, such as twistlock-console
- Hostname = blank
- Path = /
- Service = twistlock-console
- Target Port = 8083 → 8083
- Select the Security > Secure Route radio button.
- TLS Termination = Passthrough (if using 8083)
- Insecure Traffic = Redirect
- Click Create
16. Access the console
Access the console through route created and create administrator account and apply Licenses
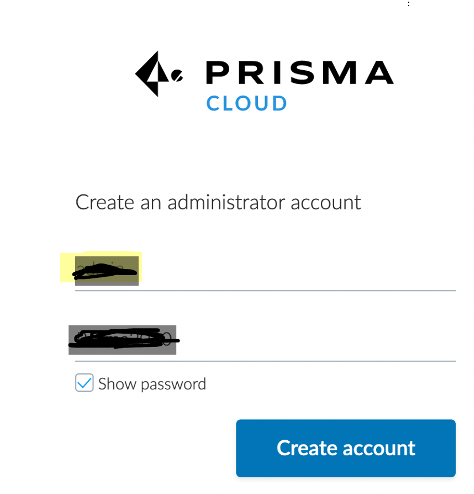
and apply the License

17. Configure the Console
oc get svc -n twistlock
Result:
NAME TYPE CLUSTER-IP EXTERNAL-IP PORT(S) AGEtwistlock-console ClusterIP 172.21.186.161 <none> 8084/TCP,8083/TCP 18h
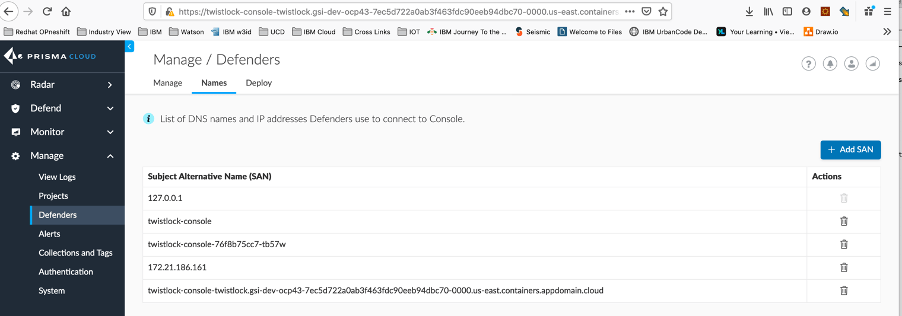
Go to Manage > Defenders > Names
Click Add SAN and enter Console’s service name.
Click Add SAN and enter Console’s cluster IP.
Any name in the table is added to Console’s certificate and becomes available as a configuration parameter in the Defender deployment pages.
After Prisma Cloud is set up with these values, you will see them in the drop down menu in all of the Defender deployment pages as a configuration parameter. When you set up a new Defender, select how it should connect to Console from the same list of names in the Subject Alternative Names table.
18. Install the defenders
On the Prisma Cloud navigate to Manage -> Defenders and select Deploy and choose settings as below :
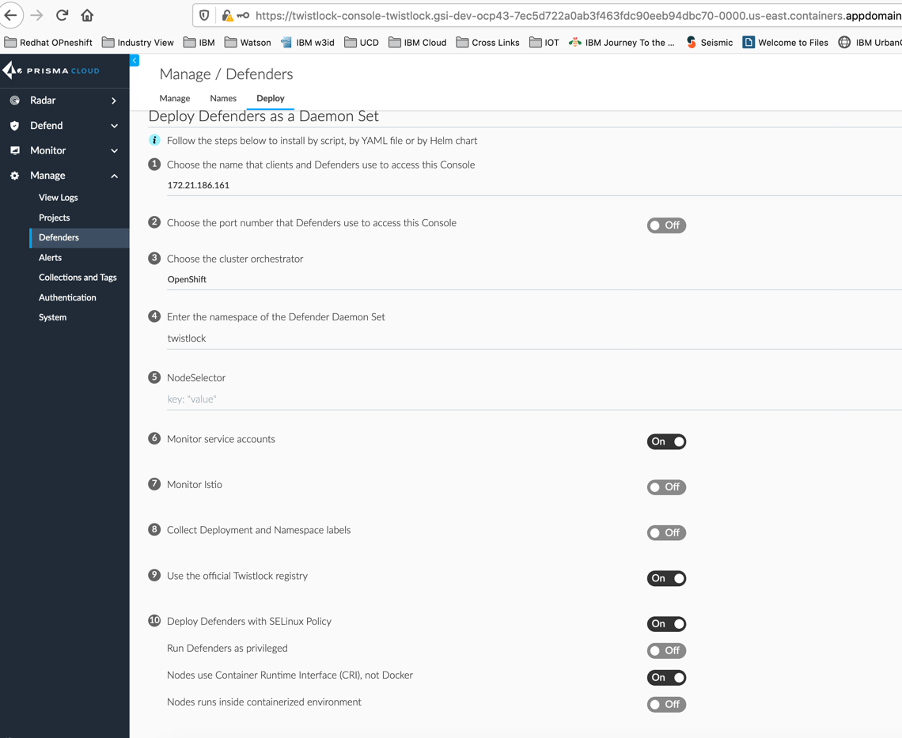
And then click on

Prisma Cloud Defenders run as containers on the nodes in your OpenShift cluster. They are deployed as a DaemonSet.
19 . Deploy the defenders
oc create -f daemonset-new.yaml
Result :
clusterrole.rbac.authorization.k8s.io/twistlock-view createdclusterrolebinding.rbac.authorization.k8s.io/twistlock-view-binding createdsecuritycontextconstraints.security.openshift.io/twistlock-scc createdsecret/twistlock-secrets createdserviceaccount/twistlock-service createddaemonset.apps/twistlock-defender-ds createdservice/defender created
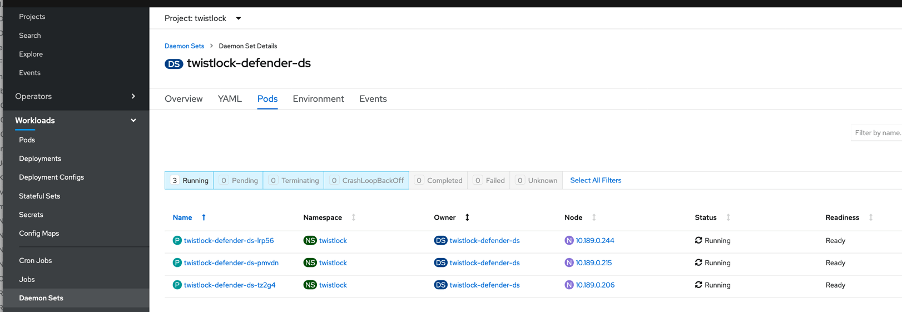
20 . Confirm the Defenders were deployed
oc get ds
NAME DESIRED CURRENT READY UP-TO-DATE AVAILABLE NODE SELECTOR AGEtwistlock-defender-ds 3 3 3 3 3 <none> 27m
OR
CI/ CD leveraging Jenkins :
Prisma Cloud integrates security into your continuous integration workflows so you can find and fix problems before they ever make it into production. Prisma Cloud’s CI tools let developers see vulnerability status every time they run a build, without having to run a separate tool or use a different interface. Security teams can set policies that act as quality control gates to ensure only remediated images progress down the pipeline.
Jenkins Configuration for PRISMA (Twistlock)
Prisma Cloud provides a Jenkins plugin that lets you incorporate vulnerability scanning into your continuous integration pipeline
- Build and scan flow After Jenkins builds a container image, the Prisma Cloud plugin scans it for vulnerabilities and compliance issues.
Prisma Cloud can pass or fail a build, depending on the types of vulnerability and compliance issues discovered, and the policies you set up in Console. By incorporating scanning into the build phase of the development workflow, engineers get immediate feedback about what needs to be fixed. The scan report provides all the information required to fix the vulnerabilities.
The sequence of events is described below:
- An engineer commits a change for a container under development. The commit triggers a build.
- Jenkins builds the container image.
- As part of the build process, Jenkins calls the Prisma Cloud plugin. The plugin collects data about the image, including the packages and binaries in the image, and submits it to Console for analysis.
- Console returns a list of vulnerabilities and compliance issues.
- The Prisma Cloud plugin passes or fails the build depending upon your configuration and policy.
- The results are displayed in the following places: o In Jenkins, within the project/job page, or relevant dashboard view. o In Prisma Cloud Console, on the Monitor > Vulnerabilities > Jenkins Jobs page.
The Jenkins plugin is built for Jenkins on Linux. To scan images with Jenkins on other operating systems, use a platform-specific twistcli binary.
Twist CLI Installation
On the Twistlock Console Navigate to Manage -> System -> Downloads
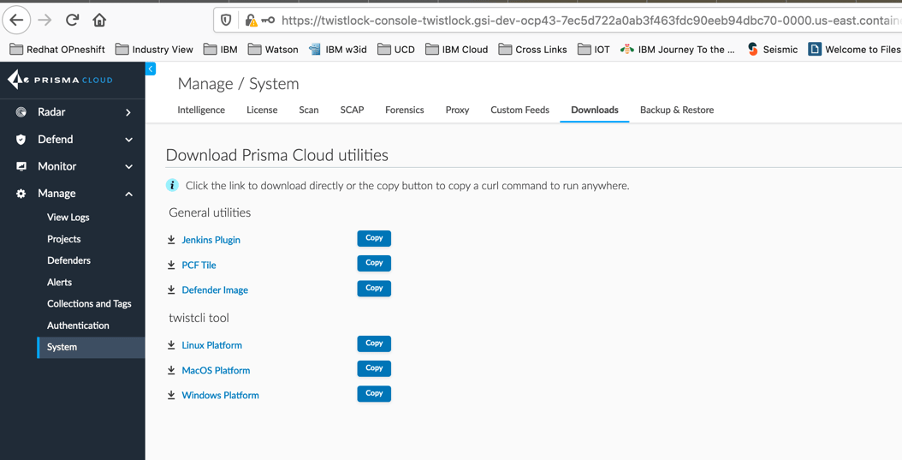
On this page , select the twistcli tool for your OS and clock on Copy
On the host install twistlock cli by pasting the copied command.
curl --progress-bar -L -k --header "authorization: Bearer eyJhbGciOiJIUzI1NiIsInR5cCI6IkpXVCJ9.eyJ1c2VyIjoiYWRtaW4iLCJyb2xlIjoiYWRtaW4iLCJncm91cHMiOm51bGwsInNlc3Npb25UaW1lb3V0U2VjIjoxODAwLCJleHAiOjE1ODk3MTcyMzcsImlzcyI6InR3aXN0bG9jayJ9.PSIP1t0olKtPDV0OjlvKMl0qKZn26oZBVQCOMtjqNes" https://twistlock-console-twistlock.gsi-dev-ocp43-7ec5d722a0ab3f463fdc90eeb94dbc70-0000.us-east.containers.appdomain.cloud/api/v1/util/twistcli > twistcli; chmod a+x twistcli;
######################################################################## 100.0%
Jenkins Plugin Installation
1. Download the PRISMA Plugin
On Prisma Cloud navigate to Manage -> System -> Jenkins Plugin to download the plugin

Next on Jenkins navigate to Manage Jenkins -> Manage Plugins and under Advanced tab on the Upload Plugin section , browse the plugin which is downloaded previous step and click upload.

Navigate back and check plugin is successfully installed

In addition also install Dashboard View and Static Utilities Plugin by selecting them in the Available tab
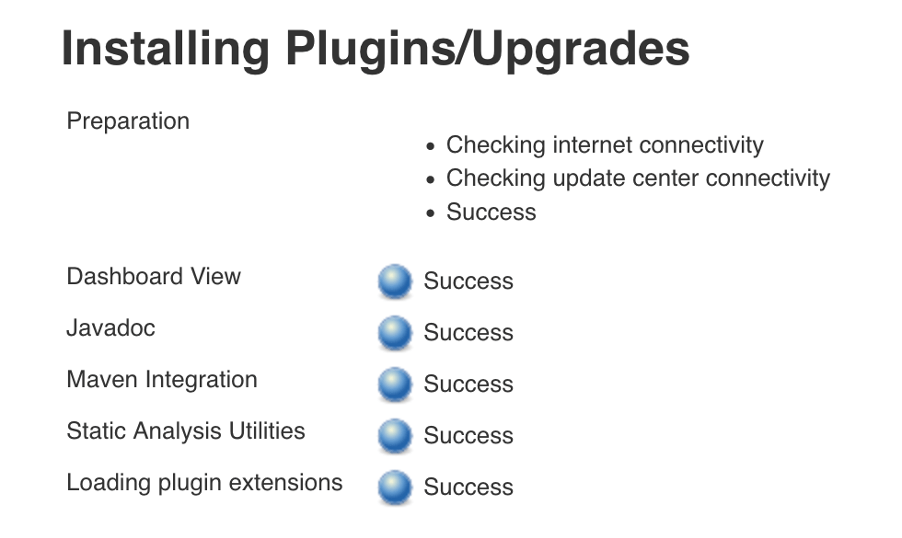
Check that the Plugins are successfully installed

- Configure PRISMA plugin
- Go to the Jenkins top page, and then click Manage Jenkins> Configure System
- Scroll down to the Prisma Cloud section.
- In the Address field, enter the URL for Prisma Cloud Console.
- In the User and Password fields, enter the CI role user’s credentials for Prisma Cloud Console.
- Click Test Connection to validate that the Jenkins plugin can communicate with Prisma Cloud Console.
- Click Save

Create Jenkins Project ( Freestyle)
Create a new project.
- Click New Item
- In Enter an item name, enter a name for your project.
- Select Freestyle project
- Click OK
Create Jenkins Project ( Pipeline)
1. Create a Freetsyle Project
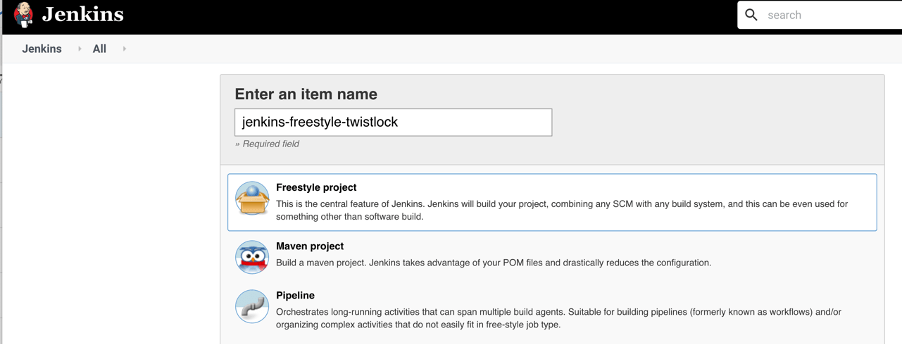
Add Build Step
- Scroll down to the Build section.
- In the Add build step drop-down list, select
- Execute shell
- In the Command text box, enter the following:
echo "Creating Dockerfile..."echo "FROM ubuntu:latest" > Dockerfileecho 'CMD ["/bin/bash", "sleep 240"]' >> Dockerfiledocker build --no-cache -t dev/ubun2:test .

Add a build step that scans the container images for vulnerabilities.
In the Add build step drop-down list, select Scan Prisma Cloud Images


Add a post-build action so that image scan results can be viewed in a Jenkins dashboard.
- Post-build Action
- In the Add post-build action dropdown menu, select Scan results file
