Migrate to Openshift
Migrate Application to Liberty Container on IBM Cloud
Migrate to Liberty
As part of this session, we will start with preparation stage of the existing application to container based stack on IBM Cloud using the Transformation advisor. As in the previous part, navigate to your workspace in the Transformation Advisor that is already created earlier.
Transformation Advisor creates some accelerators to speed up the process of migrating an application. These files are a starting point for most modernization journeys and require modification. In this section, you will modify those files for PlantsByWebSphere.
From the main recommendations page, click the
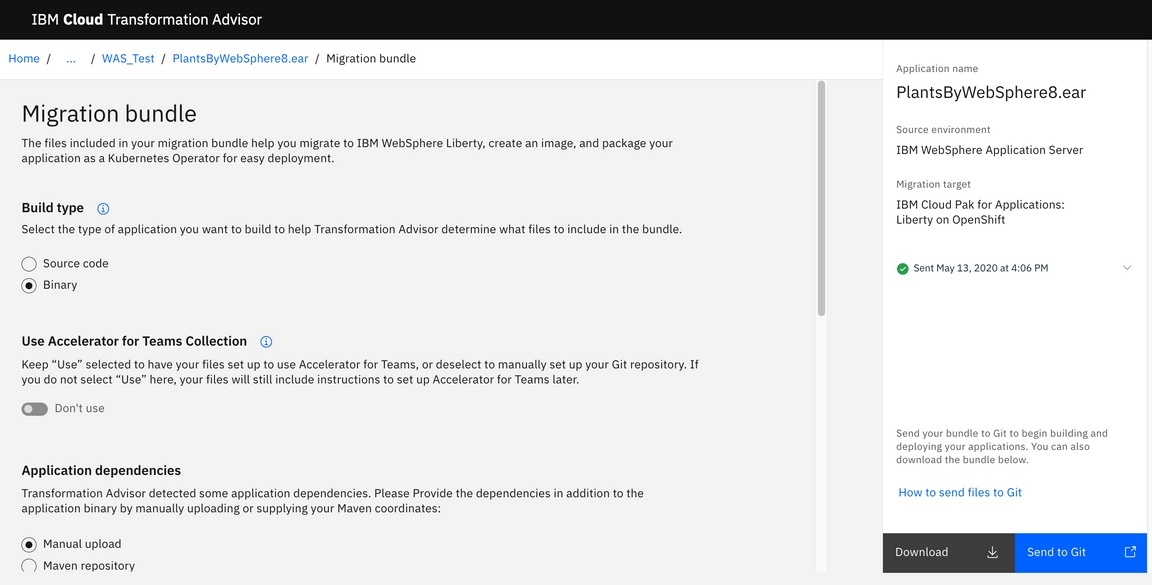
...link on the right for thePlantsByWebSphere8.earand select View migration planYou will Navigate to the Migration Bundle Page of the Transformation Advisor

Select the Build type as binary
Ensure “Don’t use” is selected for the “Use Accelerator for Teams Collection”
Select Manual upload for “application Dependencies”
- As per the application dependencies select the application binary and the db2 driver(db2jcc.jar) that we have downloaded earlier
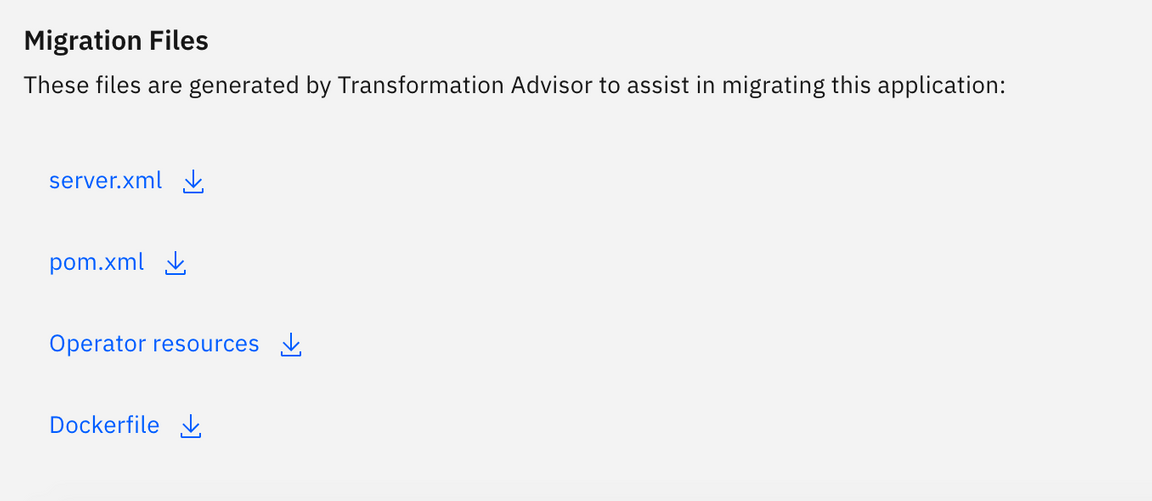
The migration files section show the below bundle

The migration plan shows the files that Transformation Advisor has generated:
- server.xml - Transformation Advisor extracts most of the configuration from traditional WebSphere and generates a server.xml for Liberty to use
- Dockerfile - Used to create the Docker image, which includes the application and configuration for Liberty
- Operator resources - Used in Red Hat OpenShift to deploy the application using the Open Liberty operator
- pom.xml - Used for Maven builds, particularly useful if the application does not already employ build scripts
We will push the Transformation generated files along with the Application binary and Db2-jcc.jar file to the git repo.
To do previous step,
First we will create a new repository in your public git hub. Let us name the repository as “ta-appmodern-migrate”
Copy the Https Url of your repository, ’https://github.com/{username}/ta-appmodern-migrate.git’
Use this git repository in your Transformation Migration
Once this is done, select the “send to git option” in the “Migration Bundle Page” to push the migration files to your git repository
we need to edit the server.xml to change the database properties and the db2jcc_licence_cu.jar. so lets clone the git repo to the local system
git clone 'https://github.com/{user}/ta-appmodern-migrate.git'
- Copy
db2jcc_licence_cu.jarto the foldersrc/main/liberty/binary/libfrom you earlier download folder of the binaries ‘(https://github.com/ibm-gsi-ecosystem/appmod-plants-app.git)’.
Ideally, Transformation Advisor could figure out enough from the original application so that the generated files contain exactly what’s needed and we could use these files as-is. Unfortunately, there are some details Transformation Advisor cannot discern, so we’ll need to add those into the files manually.
Edit the server.xml file using your favorite editor to make the following changes:
Change the
jpa-2.1feature tojpa-2.0Add health feature, to enable the health check task to be passed in the pipeline
<feature>mpHealth-1.0</feature>Uncomment the
dataSourcesandjdbcDriversAs part of the server.xml, there are two references to jdbcDriver. Each reference will map the path of the db2 and db2 licence jar locations as
${shared.config.dir}/lib/global/db2jcc.jarand${shared.config.dir}/lib/global/db2jcc_license_cu.jar. While one of jdbcDrive id is mapped toDB2_Universal_JDBC_Driver_Providerand the second is mapped toDB2_Universal_JDBC_Driver_Provider_(XA). The jdbcDriver tag snipped should be like as below
<jdbcDriver id="DB2_Universal_JDBC_Driver_Provider" javax.sql.DataSource="com.ibm.db2.jcc.DB2ConnectionPoolDataSource"><library><file name="${shared.config.dir}/lib/global/db2jcc.jar"/><file name="${shared.config.dir}/lib/global/db2jcc_license_cu.jar"/></library></jdbcDriver><jdbcDriver id="DB2_Universal_JDBC_Driver_Provider_(XA)" javax.sql.DataSource="com.ibm.db2.jcc.DB2XADataSource"><library><file name="${shared.config.dir}/lib/global/db2jcc.jar"/>
server.xml will have two reference of
datasourcetag. Each will have an element named jdbcDriverRefs. change the jdbcDriverRefs for first one as ‘DB2Universal_JDBC_Driver_Provider’ and for the second one as `DB2_Universal_JDBC_Driver_Provider(XA)`In the
PlantsByWebSphereDataSourceNONJTAdatasource, in theproperties.db2.jccline, adduser="{to share}" password="{to share}" transactional="false"In the
PlantsByWebSphereDataSourcedatasource, in theproperties.db2.jccline, adduser="{to share}" password="{to share}" transactional="true"(Database user name and password).Also change the databaseName=“{to share}”, serverName=“{to share}” and portNumber=“{to share}”
After changing the datasource tag with jdbcDriverRefs, username & password, Database details (databaseName, serverName and portNumber), the dataSource snipped should like as below:
- Note:* ???? should be replaced by actual values
DATASOURCE FIRST REFERENCE:<dataSource containerAuthDataRef="DefaultNode01/PlantsAuthAlias" id="PlantsByWebSphereDataSourceNONJTA" jdbcDriverRef="DB2_Universal_JDBC_Driver_Provider" jndiName="jdbc/PlantsByWebSphereDataSourceNONJTA"><properties.db2.jcc password="????" user="????" beginTranForResultSetScrollingAPIs="false" beginTranForVendorAPIs="false" connectionSharing="1" databaseName="????" enableClientInformation="false" enableMultithreadedAccessDetection="false" errorDetectionModel="ExceptionMapping" jmsOnePhaseOptimization="false" name="PlantsByWebSphereDataSourceNONJTA" nonTransactionalDataSource="false" portNumber="?????" preTestSQLString="SELECT CURRENT SQLID FROM SYSIBM.SYSDUMMY1" propagateClientIdentityUsingTrustedContext="false" reauthentication="false" retrieveMessagesFromServerOnGetMessage="true" serverName="????" traceLevel="-1" unbindClientRerouteListFromJndi="false" useTransactionRedirect="false" validateNewConnection="false" validateNewConnectionRetryCount="100" validateNewConnectionRetryInterval="3"/><connectionManager agedTimeout="0" connectionTimeout="180" maxIdleTime="1800" maxPoolSize="10" minPoolSize="0" reapTime="180"/></dataSource>
DATASOURCE SECOND REFERENCE:<dataSource containerAuthDataRef="DefaultNode01/PlantsAuthAlias" id="PlantsByWebSphereDataSource" jdbcDriverRef="DB2_Universal_JDBC_Driver_Provider_(XA)" jndiName="jdbc/PlantsByWebSphereDataSource"><properties.db2.jcc password="????" user="????" beginTranForResultSetScrollingAPIs="false" beginTranForVendorAPIs="false" connectionSharing="1" databaseName="????" enableClientInformation="false" enableMultithreadedAccessDetection="false" errorDetectionModel="ExceptionMapping" name="PlantsByWebSphereDataSource" nonTransactionalDataSource="false" portNumber="????" preTestSQLString="SELECT CURRENT SQLID FROM SYSIBM.SYSDUMMY1" propagateClientIdentityUsingTrustedContext="false" reauthentication="false" retrieveMessagesFromServerOnGetMessage="false" serverName="????" traceLevel="-1" unbindClientRerouteListFromJndi="false" useTransactionRedirect="false" validateNewConnection="false" validateNewConnectionRetryCount="100" validateNewConnectionRetryInterval="3"/><connectionManager agedTimeout="0" connectionTimeout="180" maxIdleTime="1800" maxPoolSize="10" minPoolSize="0" reapTime="180"/></dataSource>
- Validate the application tag to be
<application id="PlantsByWebSphere8" location="plantsbywebsphere8.ear" name="PlantsByWebSphere8" type="ear"/>
Save your changes
Reference server.xml with the changes is also available in the downloaded reference repo ‘(https://github.com/ibm-gsi-ecosystem/appmod-plants-app.git)’. The location is liberty/config/server.xml. The database details marked in ???? has to be replaced by the actual database info.
The modified server.xml should look like this:
<?xml version="1.0" encoding="UTF-8"?><!--Generated by IBM TransformationAdvisorThu Nov 21 20:49:39 GMT 2019--><server><!--These elements have been identified from this application's configuration.--><featureManager><feature>beanValidation-1.1</feature><feature>cdi-1.2</feature><feature>ejbLite-3.2</feature><feature>el-3.0</feature><feature>javaMail-1.5</feature>
- Push the change to Git (server.xml and db2jcc_license_cu.jar)git add .git commit -m "Changes related to DB -server.xml and db2jcc_license_cu.jar"git push
Now that we’ve configured Liberty and the application, let’s deploy it on the Openshift.
Run the application on Liberty
Login to your OC cluster using the Copy Login Command from the browser of the openshift console
oc login {Cluster info}oc project dev-{initial}oc project -qLet us use openshift S2I to build and deploy
oc new-app 'https://github.com/{repo}/ta-appmodern-migrate.git' --name=plantsbyliberty..........--> SuccessBuild scheduled, use 'oc logs -f bc/plantsbyliberty' to track it progressApplication is not exposed. You can expose services to the outside world byexecuting one or more of the commands below:'oc expose svc/plantsbyliberty'
Check the logs to track the build and deployment. This will take few minutes to deploy
oc logs -f bc/plantsbylibertyOnce the deployment is completed, create the service for the application
oc expose svc/plantsbylibertyoc statusIf you need to redeploy the app after some changes, you can do this by manually triggering the below command
oc start-build plantsbyliberty
- Now you can access the application by getting the hostname for the application by using get routesoc get routes | grep plantsbyliberty
As we plan to use the Tekton pipeline to deploy the application to the Openshift environment, we need additional files to be copied.
Copy charts (folder) to your base directory from the earlier downloaded/clone repository ‘(https://github.com/ibm-gsi-ecosystem/appmod-plants-app.git)’. This Contains the files related to pipeline deployment configuration.
Copy assets (folder) to your base directory from the earlier downloaded/clone repository ‘(https://github.com/ibm-gsi-ecosystem/appmod-plants-app.git)’. This Contains the Binaries of both the application and Db2 related, in a structured manner, that shall be used by the pom.xml during the maven build as part of the test stage in the pipeline.
Copy Jenkinsfile (file) to your base directory from the earlier downloaded/clone repository ‘(https://github.com/ibm-gsi-ecosystem/appmod-plants-app.git)’. This Contains the definition to the pipeline using the javalibertyapp image
Copy pom.xml (file) to your base directory from the earlier downloaded/clone repository ‘(https://github.com/ibm-gsi-ecosystem/appmod-plants-app.git)’. The original pom.xml generated by TA will be replaced by this pom.file. This file uses the websphere liberty container as runtime environment, since this application would need JPA2.0 supported environment for database access.
TA generated pom will look like as below
<!-- Generated by IBM TransformationAdvisor --><!-- Wed May 13 10:33:04 UTC 2020 --><project xmlns="http://maven.apache.org/POM/4.0.0" xmlns:xsi="http://www.w3.org/2001/XMLSchema-instance"xsi:schemaLocation="http://maven.apache.org/POM/4.0.0 http://maven.apache.org/xsd/maven-4.0.0.xsd"><modelVersion>4.0.0</modelVersion><groupId>com.ibm.ta</groupId><artifactId>plantsbywebsphere8</artifactId><version>1.0.0</version>Replaced pom for the pipeline to use websphere liberty is as below
<project xmlns="http://maven.apache.org/POM/4.0.0" xmlns:xsi="http://www.w3.org/2001/XMLSchema-instance"xsi:schemaLocation="http://maven.apache.org/POM/4.0.0 http://maven.apache.org/xsd/maven-4.0.0.xsd"><modelVersion>4.0.0</modelVersion><parent><groupId>net.wasdev.wlp.maven.parent</groupId><artifactId>liberty-maven-app-parent</artifactId><version>RELEASE</version></parent>Push the change to Git (file related to pipeline)
git add .git commit -m "Changes related to Enablement of the pipeline deployment"git push
Now that we are ready for the application deployment on the Openshift cluster, we will here follow the pipeline approach for the build and deployment. Let us use the Cloud Shell for the same
Login to your OC cluster using the Copy Login Command from the browser of the openshift console
$ oc login {Cluster info}$ oc project dev-{initial}$ oc project -qLet us use igc pipeline to build and deploy. From the repository directory let us execute the oc sync command to configure your project environment in the openshift cluster
$ oc sycn {your project} --devSetting up namespace {your project} and serviceAccount defaultLet us trigger the pipeline using the oc pipeline command from the same repo directory.
This would request you request for pipeline to select with options
- Jenkins
- Tekton
Select the Tekton option
As the next step, to configure git repo for the pipeline, it would ask for the git
- username (if not configured already for this project)
- Token/password (if not configured already for this project)
- branch (Press enter if branch is (master)) otherwise provide the branch details
Next it would request for the “Select the Pipeline to use in the PipelineRun”
- Select the option : igc-java-maven-v1-2-0
The output of the exection of oc pipeline as below
$ oc pipeline? Select the type of pipeline that should be run? TektonCreating pipeline on openshift cluster in {your project} namespaceGetting git parametersGit credentials have already been stored for user: {user name}Project git repo: {your git repor}? Provide the git branch that should be used: masterCreating service account: pipelineThis will create the project pipeline in {your project} and the pipeline will start executing. You can see the pipeline execution as part of the openshift dash board.
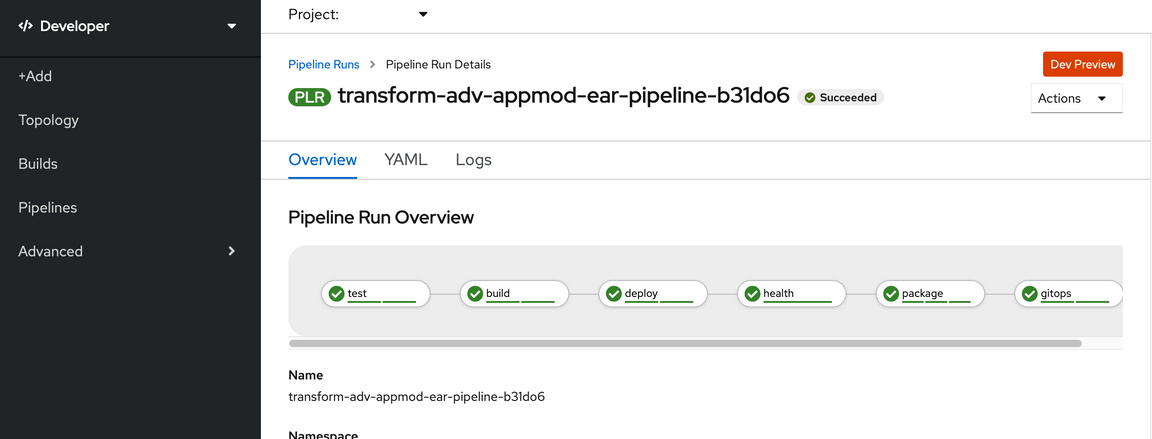
- Navigate to the Developer Console -> Navigate to the ‘Pipelines’ in the left Nav -> Select your project space from the drop down option -> select your application link -> Select the ‘Pipeline Runs’ and again the application link.

Once the pipeline is executed successfully, the application can be tested. To get the routes of the application first navigate to the
- Topology on the left nav -> Then click on your application. On the right side you should see the overview and resources -> navigate to the resources tab, you would be able to see the routes link. Using the routes link, test the application access
Test the app
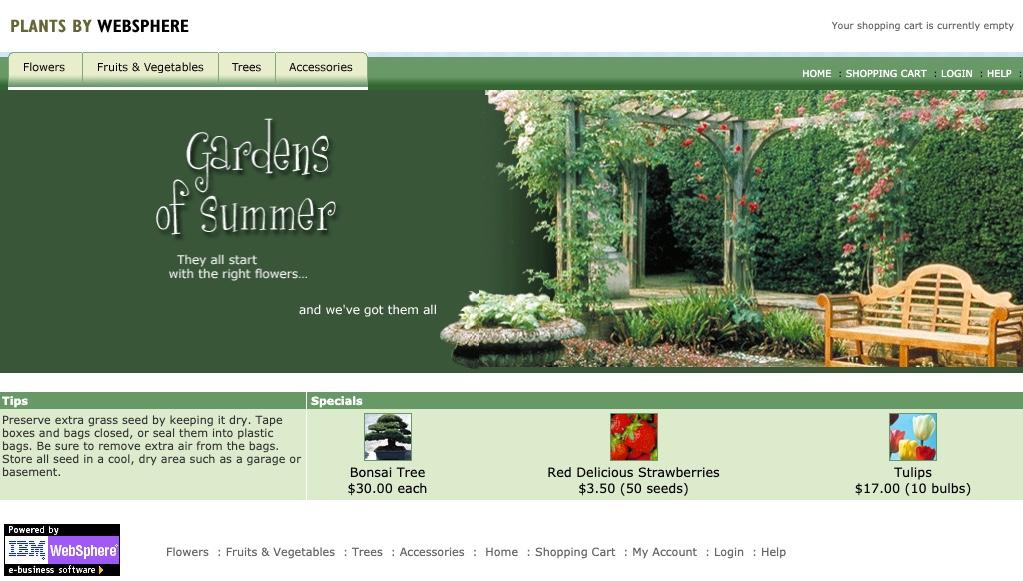
Open browser to ‘http://{host}/PlantsByWebSphere’
You will be able to landup in the home page of the application

That’s it. You now have this application running on Liberty in a Docker container which is sufficient for this exercise.
Summary
You have now completed a simple Application Modernization exercises in multiple steps. This exercise demonstrated a simple runtime modernization scenario that can be moved to cloud without any code change to the application.