Overview - Day 0
Provides information for provisioning an environment using the Cloud-Native Toolkit. It describes the available options and associated considerations for how the environment can be structured. Additionally, this section provides step-by-step guides to get an environment up and running using repeatable Infrastructure as Code components.
Paths to Installation
The Cloud-Native Toolkit environment can be hosted in any Kubernetes or Red Hat OpenShift cluster, including those managed by IBM Cloud. The environment is provisioned using infrastructure-as-code Terraform scripts that make the process declarative, automated, and repeatable.

Entry points
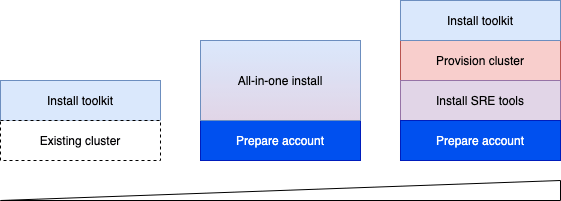
There are different entry points into the Cloud-Native Toolkit depending on the environment. The simplest approach is to install the Cloud-Native Toolkit on an existing cluster. The existing cluster can be Red Hat OpenShift running anywhere or IBM Cloud Kubernetes Service. The next simplest way to install the Cloud-Native Toolkit is to use the All-in-One approach to provision the cluster, SRE tools, and install the Cloud-Native Toolkit in one step. Finally, for more control of the environment each of the steps can be performed individually.
Install approaches
There three different options for installing the components:
- Quick-installer - one-line installer that can be used to install the Cloud-Native Toolkit on an existing cluster
- Private Catalog Tiles - for environments within IBM Cloud, the install functions can be invoked using tiles in a private catalog similar to installing other software within the account
- Iteration Zero - for a highly-customized installation or to install in an environment other than IBM Cloud then you can work directly with the Iteration Zero terraform scripts
A full installation of the Cloud-Native Toolkit is organized into four activities:
Prepare the account
Explains the planning and configuration required to prepare for the installation of the Toolkit.
Provision a cluster
Provisions a cluster into which the toolkit will be installed.
Install the toolkit
Explains the end-to-end process for provisioning the environment with the Toolkit. Within that process, there two primary installation options. Select the approach that best suites your requirements:
Install in IBM Cloud-managed cluster: Create a new environment in IBM Cloud, optionally creating a new cluster in the process.
Install in existing OpenShift: Create a new environment in an OpenShift cluster running anywhere.
Complete the configuration
Explains the steps to finalize the setup of the environment and begin on-boarding developers.
Day 0 Concepts/Tools Explained
Infrastructure as Code
Infrastructure as Code (IaC) uses a high-level descriptive coding language to automate the provisioning of IT infrastructure. This automation eliminates the need for developers to manually provision and manage servers, operating systems, database connections, storage, and other infrastructure elements every time they want to develop, test, or deploy a software application.
In an era when it’s not uncommon for an enterprise to deploy hundreds of applications into production every day—and when infrastructure is constantly being spun up, torn down, and scaled up and down in response to developer and user demands—it’s essential for an organization to automate infrastructure in order to control costs, reduce risks, and respond with speed to new business opportunities and competitive threats. IaC makes this automation possible.
IaC is also an essential DevOps practice, indispensable to a competitively paced software delivery lifecycle. It enables DevOps teams rapidly create and version infrastructure in the same way they version source code and to track these versions so as to avoid inconsistency among IT environments that can lead to serious issues during deployment.
Sai Vennam takes a closer look at IaC in the following video, “What is Infrastructure as Code?”:
GitOps
GitOps is the operational pattern of using source code repositories (namely Git) as the source of truth for defining the configuration that makes up the desired state of the operational environment. Git repositories are used to declaratively represent the desired state of applications in deployment environments.
GitOps takes advantage of several Git features:
- Git provides a versioned history of changes, listing what was changed and who made the change
- Change releases can be managed from a pull request, allowing multiple people to make changes but a select few to approve the changes
- Git provides access control mechanisms to limit who can change and view the configuration
- Git enables changes to be rolled back quickly if there is an issue with a new release
- Git supports multiple models for change management: Branches, Forks, GitFlow, etc
- Hosted git providers (like GitHub) provide a rich API that allows the different operations to be automated, if desired
IBM Cloud Account
The IBM Cloud environment is provided with a number of powerful tools to manage user access and resource provisioning but little is configured for you out of the box. This guide gives an approach to managing the account in a sensible way that can easily be extended or re-configured based upon the requirements of a given situation.
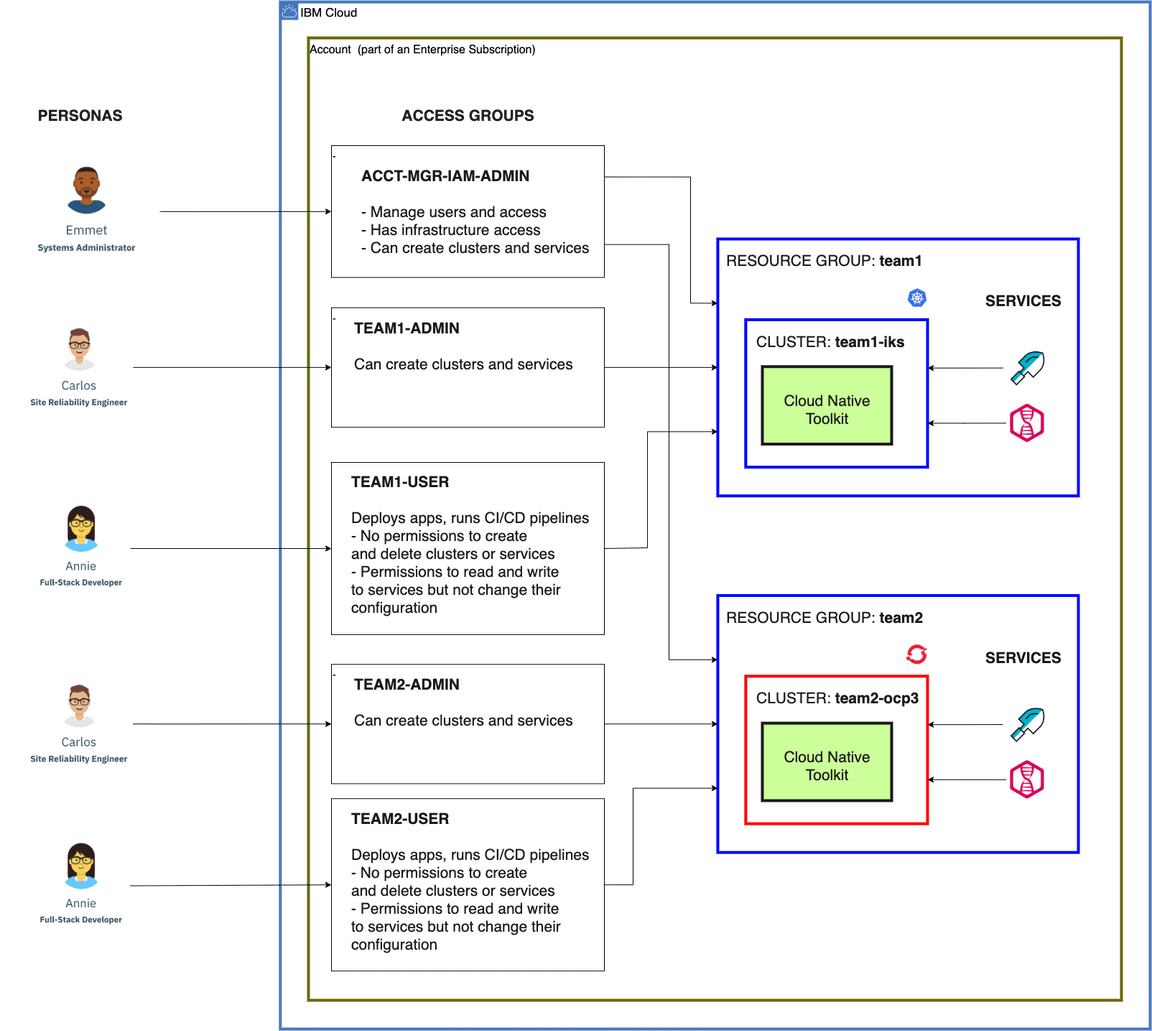
This approach to managing the account is organized around four key roles:
- Account owner(s)
- Account managers
- Environment administrators
- Environment users
This diagram from Resource Access Management shows the relationship of these access groups to a pair of development environments:

Account owner(s)
The account owner(s) is the user who owns the account or users who have been granted super-user access to the account
at the same level as the account owner.
An account owner must create the access group for account managers. The account owner will:
- Create an
ACCT-MGR-IAM-ADMINaccess group using theacp-mgrscript - Add a functional ID, configured using the
acp-iaasscript, with API keys for the account managers
Account managers
The account managers are an account owner or other users with account management permissions
As described in Configure Account, the account managers can set up the resource groups and access groups needed to install and use the environments. For each environment, the account managers will:
- Create a resource group
- Create an access group named
<resource_group>-ADMINusing the scriptacp-admin - Create an access group named
<resource_group>-USERusing the scriptacp-user
Environment administrators
The environment administrators are users in the account
with permissions to create services in the environment’s resource group. In
this case, the “environment” is scoped to the resource group. Environment administrators are granted broad access
to create, manage, and destroy services and resources within a given resource group.
Environment users
The environment users are users in the account with permissions to use existing services in the environment’s resource group
(e.g. developers, data scientists, etc.). They are consumers of the services and resources that have been provisioned in
order to build and deploy business applications.
Architecture
The Environment Architecture page shows the structure of the environment that will be installed. Depending upon the approach for development teams, each development team can be assigned its own (small) environment or multiple teams can share a single environment. The environment structure is designed to support best practices for a cloud-native application architecture, including designing applications that are built to manage.
Private Catalogs
Private catalogs provide a way to centrally manage access to products in the IBM Cloud® catalog and your own catalogs. You can customize your private catalogs to make specific solutions available to users in your account. By doing so, you can ensure that your catalogs are relevant to your business.
Let’s say you’re an operations admin for your team, and you require access to all products in the IBM Cloud catalog. A member of your team is tasked with a specific project, for example, building a voice-enabled chatbot by using Watson Assistant, Speech to Text, and Text to Speech. And, you want them to access only those products in the IBM Cloud catalog.
To achieve this, you create one catalog that includes all products in the IBM Cloud catalog. Then, you create another catalog that includes only the required products, and you give the team member viewer access to the catalog.
Additionally, custom software can be added to the private catalog and easily installed through the tile.