Contributing
Cloud-Native Toolkit
Cloud-Native Toolkit is an organized effort managed by the IBM Garage to help development teams build and deliver cloud-native solutions deployed to IBM Cloud with IBM Kubernetes and Red Hat OpenShift Managed Service. The work is managed as an Open Source project and contribution is welcome from anyone that would like to participate. The following guidelines will help everyone navigate the process of contributing. (Most of these steps will generally apply to any Open Source project.)
Project structure
Before diving into the steps, it’s important to get a general understanding of the organization structure of the repositories. The various components that make up the Cloud-Native Toolkit are organized into different git repositories that are aligned around solution space, release schedule, and intended audience. Currently, these repositories are divided between two public Git organizations:
All of the repositories in the github.com/cloud-native-toolkit organization belong to the Cloud-Native Toolkit. Within the github.com/IBM organization only the following repositories contain Cloud-Native Toolkit content:
- IBM/template-graphql-typescript
- IBM/template-java-spring
- IBM/template-node-angular
- IBM/template-node-react
- IBM/template-node-typescript
- IBM/ibm-garage-tekton-tasks
- IBM/template-argocd-gitops
- IBM/template-ibmcloud-services
(These repositories have been relocated to the github.com/IBM because their content applies more broadly than the Cloud-Native Toolkit and/or fits in with the larger catalog of related Code Pattern and Starter Kit content).
How to contribute
1. Look through the issues
Whether you have a question/issue with existing behavior or an idea for a new feature that can be added to the Toolkit, the place to begin is looking through the issues. Each repository has its own list of issues. If you have an issue with content from a specific repository then any related issues will likely be found there.
However, given the wide range of repositories and the interconnected nature of many of the components it is usually best to look at the ZenHub board. The following steps are the best way to view the board:
Open the github.com/cloud-native-toolkit/planning repository
Click on the
ZenHublink along the top menu. Note: You must install the ZenHub extension for the link to appear
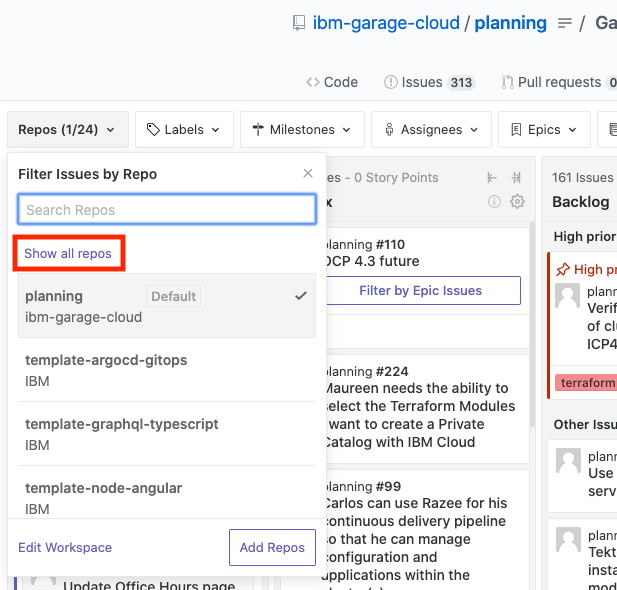
- Cloud-Native Toolkit repositories have been displayed. If the drop-down does not read `Repos (24/24)` then do the following to select them all:
Look at the
Reposdrop-down in the top-right of the board to ensure all the issues for the variousi. Click on the
Reposdrop-downii. Select the
Show all reposlink
Use the filters and/or the search bar to find cards related to your issue.
If you find an existing ticket that is related to your issue, add your information to the card.
Existing defect
If you find an existing defect, be sure to add a comment with the details of your specific
scenario. When the defect has been addressed and the ticket has been moved to the Review/QA
stage, we will ask you to help test the solution in your environment.
Existing feature
If you find an existing feature request, please indicate your interest through a comment. As appropriate, include the business requirements or user story that is driving the request. We will use this input to help determine prioritization of new features.
No issue found
If you are unable to find a card that is related to your issue or feature, proceed to the next step to create a new issue. The search doesn’t need to be an exhaustive one and if there is any question whether the item is new or a duplicate, go ahead and create a new issue. We’d rather have the item captured and mark it as a duplicate after the fact, if necessary, than to have an issue fall through the cracks.
2. Create a new issue
If you could not find an existing issue related to your problem or feature then its time to create a new issue. Issues fall in one of two categories:
- Bug
- Feature
Bug
Bugs can be either be reported against the repository that has the problem or in the general github.com/cloud-native-toolkit/planning repository. These are the steps for reporting a bug:
Navigate to the repository in the browser
Click on the
Issuesmenu item at the top then click onNew Issue
Click
Get Startedon theBug reporttemplate to create a new issue from the template. Note: At the moment, some repositories do not haveBug reporttemplates defined. If a template does not exist you will see the blank issue dialog.
Provide all the information relevant to the bug, particularly the details of your scenario and the steps to reproduce
Feature
Features should be reported against the github.com/cloud-native-toolkit/planning repository. These are the steps for requesting a feature:
Navigate to the github.com/cloud-native-toolkit/planning repository in the browser
Click on the
Issuesmenu item at the top then click onNew Issue
Click
Get Startedon theFeature requesttemplate to create a new issue from the template
Provide all the information relevant to the bug, particularly the details of the problem addressed by the feature and the impact/benefit of implamenting the feature
3. Setup your repository for development
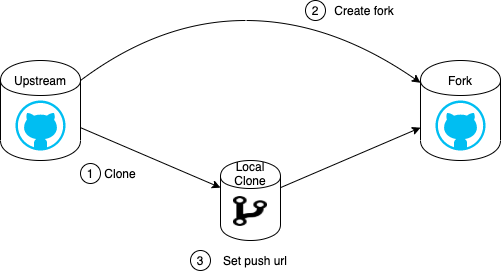
On an Open Source project there are typically a few maintainers who have direct access to the repositories and a larger number of contributors who do not. In this case, the way to introduce changes to the repositories is through a fork. The process for setting up the fork is as follows:

Clone the repository to which you want to introduce changes (the
upstreamrepository) to your local machinegit clone {upstream repo url}Create a fork of the
upstreamrepository by pressing theForkbutton at the top of the page
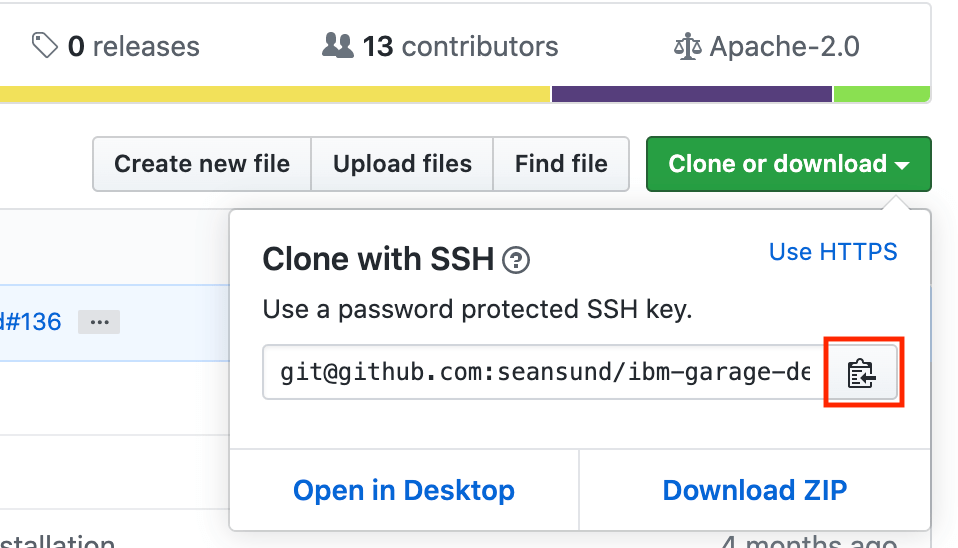
Copy the url of the repository fork

Open a terminal to the cloned directory and run the following to set the push url to be the url of the repository fork
git remote set-url --push origin {fork repo url}List the remotes for the local repository clone to verify that the fetch and push urls are pointing to the appropriate repositories
git remote -vThe output should look something like the following, with the
fetchpointing to theupstreamurl and thepushpointing to thefork
With the local clone set up this way, any time you get changes from the remote
(e.g. git pull) the changes will be pulled from the upstream repository. Similarly,
when you push changes they will be pushed to the fork.
4. Develop your changes
Now that you have a fork and a local clone of the repository, you can start making your changes. This part is mostly business-as-usual for software development. We have a couple of best practices we recommend:
Work in a branch
It is a best practice to make your changes in a separate branch, even though the changes will be made in your own fork. There are at least two good reasons for doing this:
The branch can be named after the issue number and the feature
Naming the branch according to the change that is being made provides a bit of documentation for the purpose of the branch. It also helps enforce the notion that the branch exists only for the implementation of that feature.
The branch can be rebased when new changes come in from the
upstreamThrough the course of development of the branch, other changes may be introduced in the upstream repository. Making the changes in a separate branch allows for the upstream changes to be easily pulled in on the master branch and applied to other branches as appropriate.
Create the branch by running:
git checkout -b {branch name}
Push the branch up to your fork by running:
git push -u origin {branch name}
Commit message format
Each commit message should clearly describe the changes that are being made. During the development process as many small changes are made, a single one-liner is sufficient for the commit message.
With larger changes or when the changes in the branch are squashed into a single commit, the following commit message format is preferred.
Writing commit messages
<type>indicates the type of commit that’s being made. This can be:feat,fix,perf,docs,chore,style,refactor.<scope>the scope could be anything specifying place of the commit change or the thing(s) that changed.<subject>the subject should be a short overview of the change.<body>the body should be a detailed description of the change(s). This can be prose or a bulleted listing.<issue reference>the issue reference should be a reference to the issue number under which this change is being made. The issue reference should be in the format of{git org}/{git repo}#{issue number}
Commit message format:
type(<scope>): <subject><BLANK LINE><body><BLANK LINE><issue reference>
Create a draft pull request when the branch is first pushed to the fork
GitHub recently introduced draft pull requests that allow a pull request to be recorded but
marked as not yet ready for review. Git provides a url to open a pull request the first time a branch
is first pushed to the remote, which gives an excellent and easy opportunity to create the draft.
Note: Be sure to link the pull request with the issue
Creating a draft pull request early has the following benefits:
- Clicking the link provided by Git sets up the source and target repos/branches for you so you don’t need to hunt around
- Having the draft pull request gives insight for everyone else where the work is being done
Push changes to your fork frequently during development
As you are making changes, push them frequently to the fork. This ensures that your code is backed up somewhere and allows everyone else to see what activity is happening. It also means that if you get pulled into some other work, the latest version of your changes are available for others to possibly pick up where you left off.
Pull in the latest changes from master frequently and rebase your branch
It is good to make sure you are always working off of the latest code from the upstream. With the changes in a separate branch, it is easy to bring in upstream changes with the following steps:
Checkout master in the local clone
git checkout masterPull in the changes from the
upstreamrepositorygit pullCheck out your branch
git checkout {branch}Rebase your branch on master
git rebase masterForce push the changes
git push --force-with-lease
5. Create your pull request
GitHub has recently added a new feature that allows a pull request
to put into draft status. This is helpful to record a pull request
as pending work even if the changes are not yet ready for review.
Open your fork repository in a browser
Click
New pull request
Select the appropriate target and source branches for the pull request and press
Create pull request
base repositoryis the target repository into which your changes should be merged (should be the upstream repository)baseis the target branch in the upstream repository into which your changes should be merged (typically this will bemaster)head repositoryis the source of the changes (this should be your fork repository)compareis the branch containing your changes that should be mergedWrite the title and description of the pull request
Link the pull request to the related issue

Click
Create pull requestorCreate draft pull requestto submit
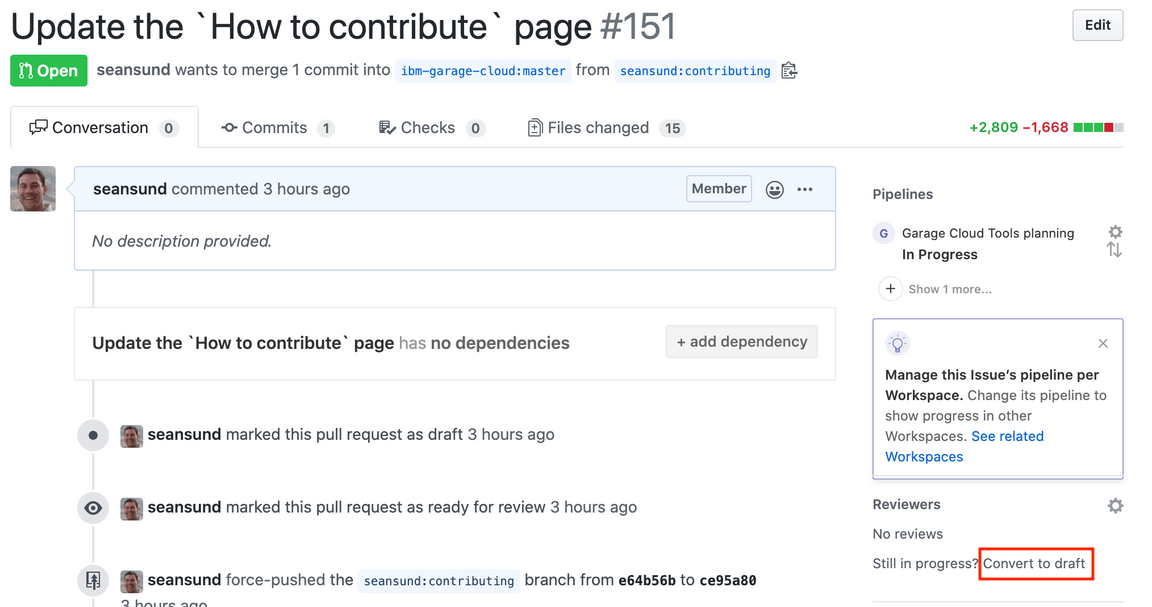
Note: A pull request can be converted to a draft after it was created
by clicking on the Convert to draft link located unter the Reviewers
section on the right-hand side.

6. Prepare your branch to submit the pull request for review
Pull in the latest changes from master frequently and rebase your branch, as described in the previous section
(Optionally) Rebase your branch to squash commits and clean up commit messages.
An interactive rebase will allow you to clean up your branch before submitting it for review. This will reduce the number of commits down to the core set of changes that reflect the feature/bug fix, remove any commits that aren’t part of the change you are making, and clean up the commit messages to clearly describe the changes and follow the commit message format guidelines.
7. Submit your pull request for review
Assuming you have previously created a draft pull request, when you are ready to have your code reviewed and merged then you will need to indicate that in the pull request.
Open the browser to the upstream repository.
Select the
Pull requeststab, find your pull request in the list and open it.Press the
Ready for reviewbutton to tell the maintainers the pull request is ready to be processed.
8. Update your pull request
Keep an eye on the pull request after it has been submitted for review. The maintainers may have questions or request changes before the pull request can be closed. The GitHub system should notify you when changes are made to your pull request.
Also, the maintainers all have day jobs and sometimes pull requests get overlooked. If your pull request has
sat for a while you can get some attention to it by tagging one of the maintainers in a commit comment.
E.g. @seansund @csantana @bwoolf1 @lsteck